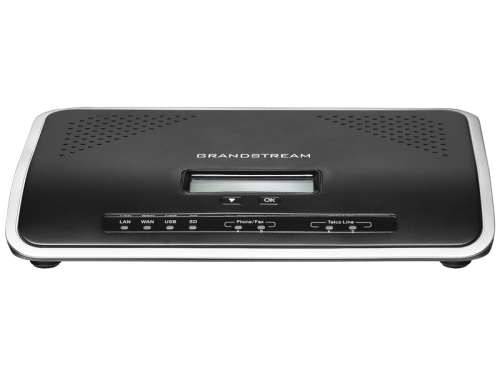
The UCM series IP PBX is a full-featured, easy-to-manage IP PBX Appliance designed to bring enterprise-grade features to small-and-medium sized businesses (SMBs) without the need for licensing fees, costs per feature, or any recurring costs. Powered by an advanced hardware platform with robust system resources, the UCM series offers a highly versatile, turnkey solution for converged voice, video, data, and mobility applications, including fax and video surveillance.
Related Links:
Before continuing with this guide, please review our Asterisk Design Guide for considerations that affect all Asterisk-based deployments.
Although we'll be demonstrating three different ways to utilize the UCM6202 for T.38 Fax over IP, there are several settings that should be set regardless of which configuration method you've chosen. Follow the steps below before configuring deployment-specific options.
UCM6202 Firmware
Firmware Version Required: 1.0.13.14+
To update your firmware, log into your UCM6202 device via the Web Interface (the default username/password are: admin/admin). Once logged in, navigate to "Maintenance - Upgrade" and select the folder icon next to "Firmware File Path" and upload the firmware file you've downloaded from Grandstream's website. (Firmware Site). Note: You will need to extract the .zip archive and upload the file ending in .bin. Once completed, the device will prompt you to reboot, be sure to do so and then move on to the next step.

VoIP Trunk Configuration
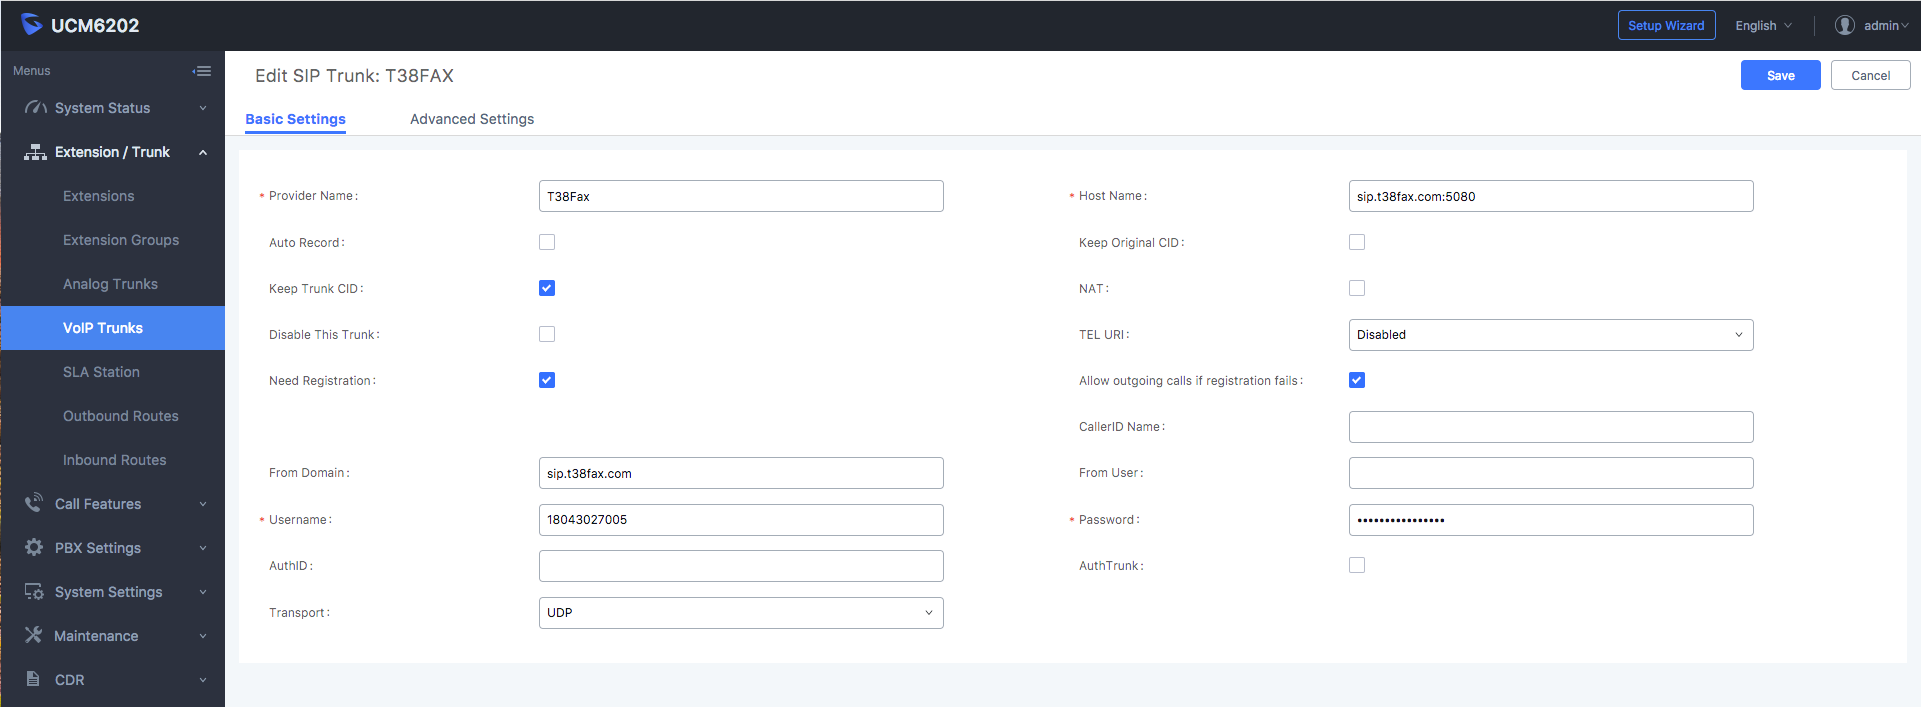
Now, configure a VoIP Trunk to configure the options required to register a trunk on the UCM6202 to your T38Fax.com SIP Trunk account. You will need to configure the "Basic" settings first, Save & Apply the configuration and edit the trunk again to finish configuring the Advanced Settings. Navigate to "PBX - VoIP Trunks" and create a new trunk. Configure the following options under the "Basic Settings" tab:
- Provider Name: T38Fax
- Host Name: sip.t38fax.com:5080 ⓘ
- Transport: UDP
- Needs Registration: True (Checked)
- Allow Outgoind Call if Reg Failure: True (Checked)
- From Domain: sip.t38fax.com
- Needs Registration: True (Checked)
- Username: SIP_USERNAME ⓘ
- Password: SIP_PASSWORD ⓘ
- NAT: Not Checked
See the screenshot below for an example:
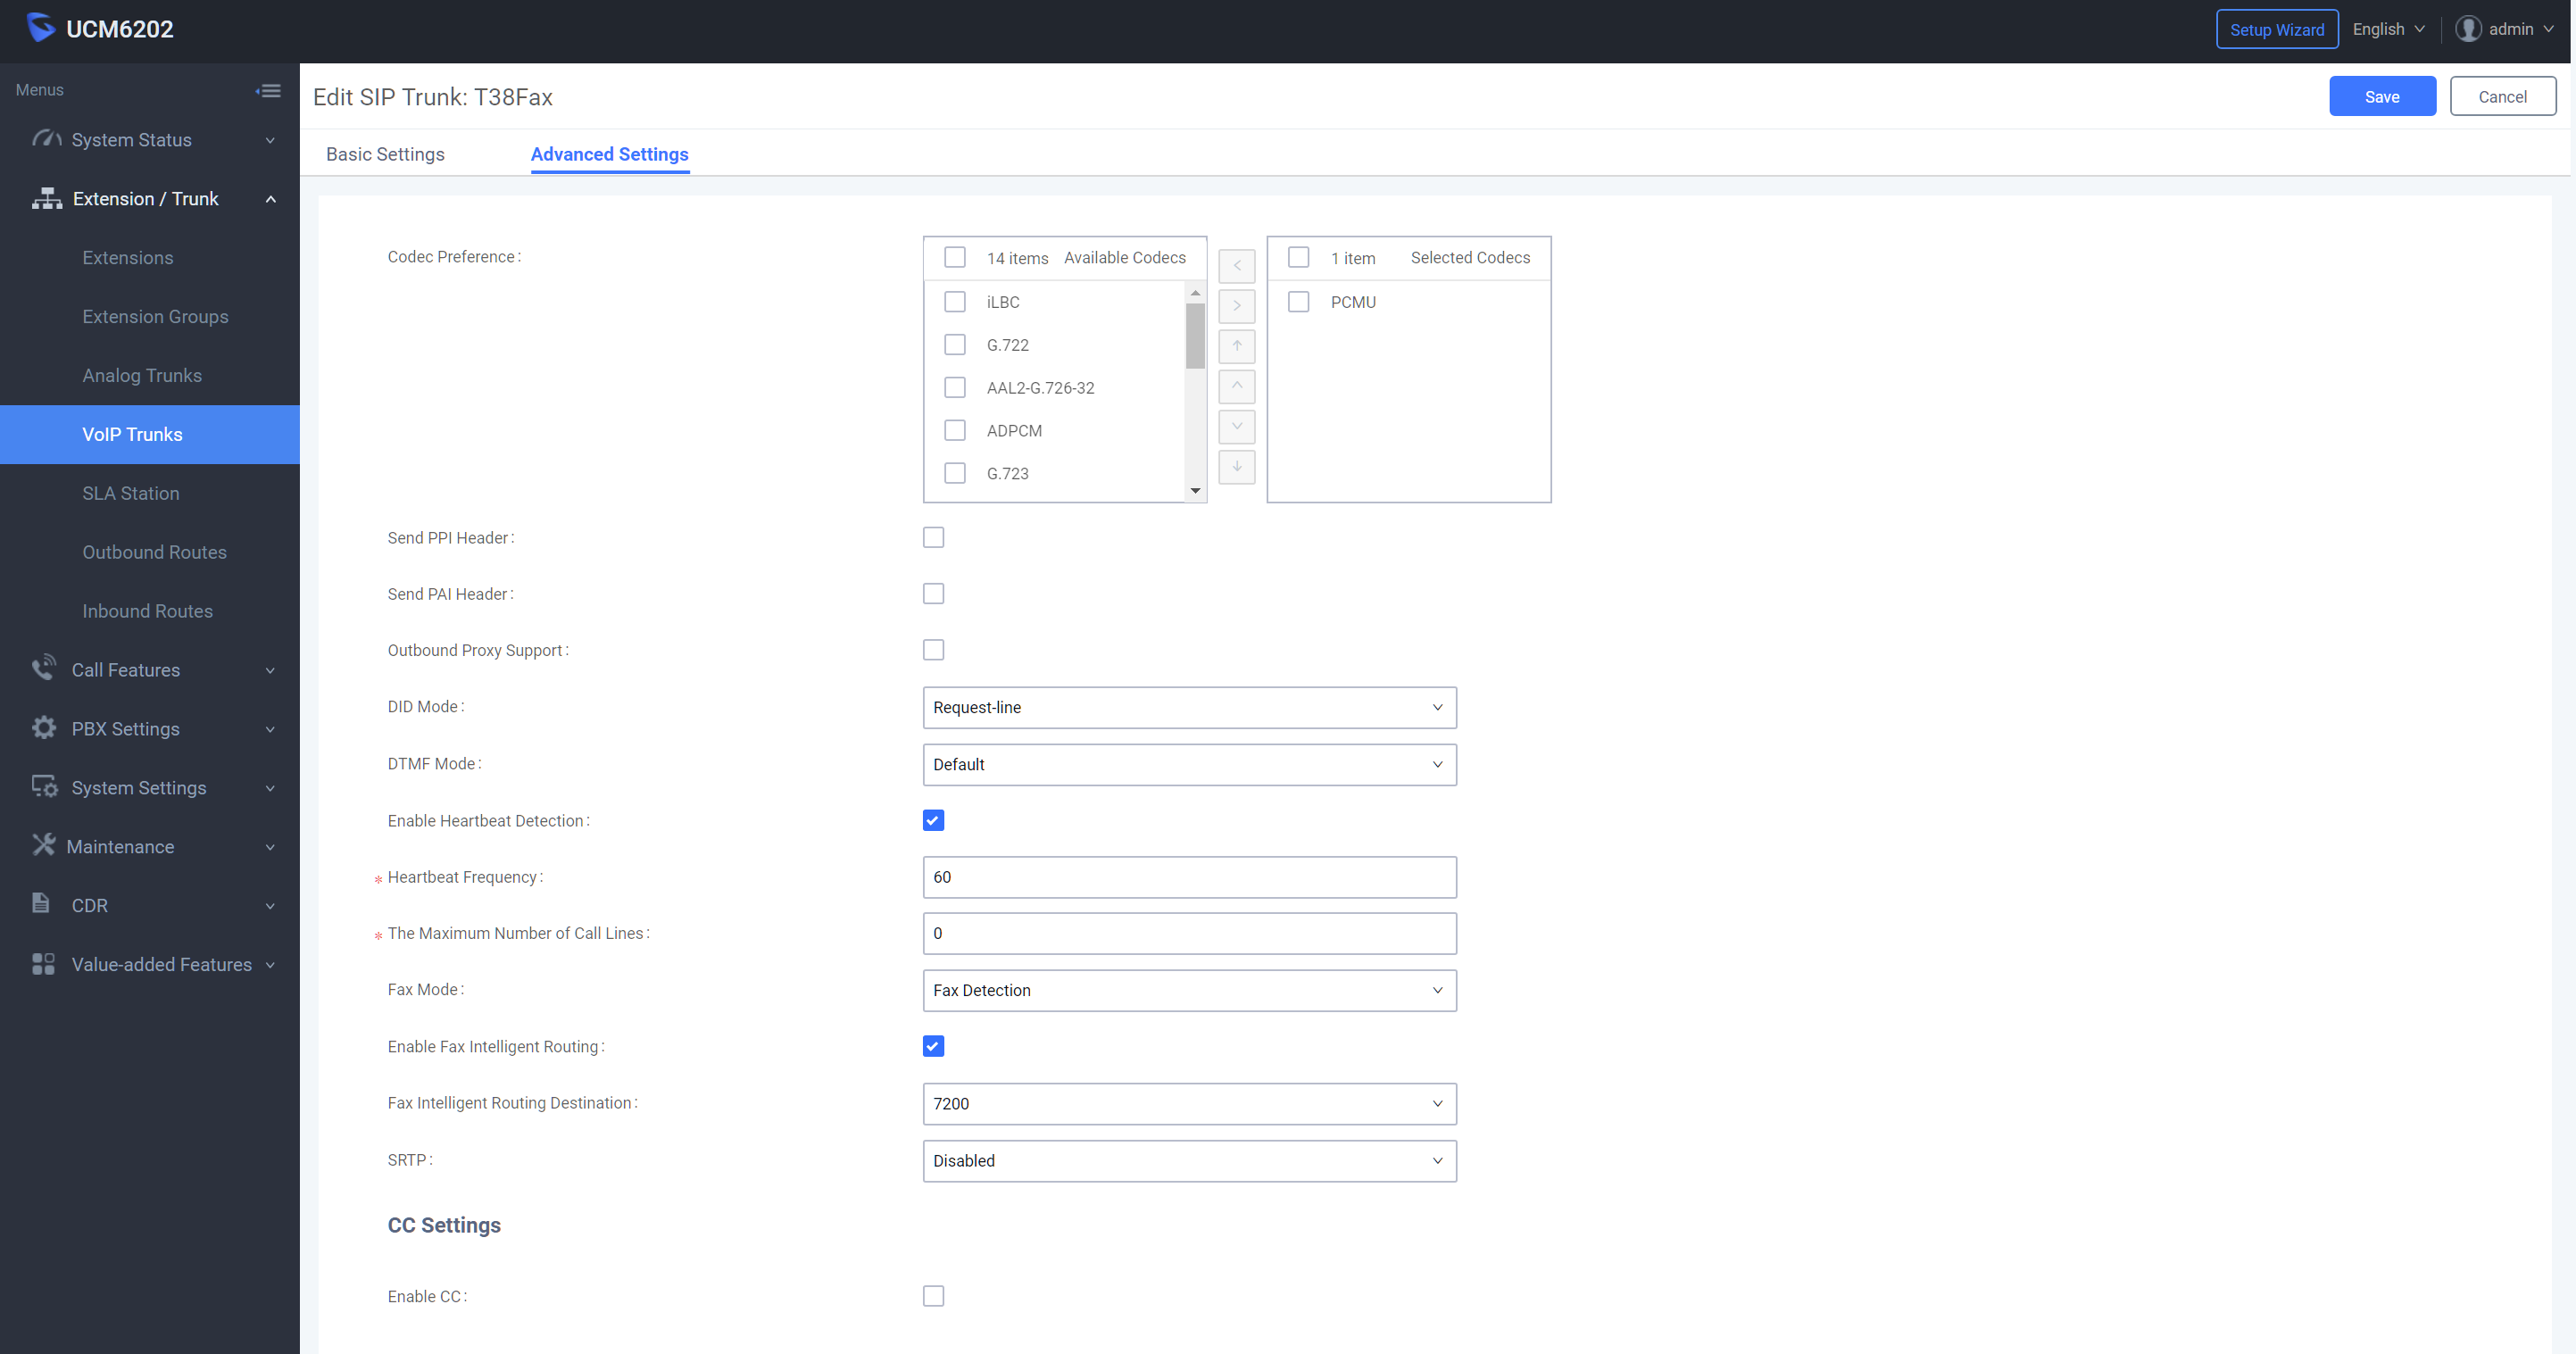
"Save & Apply" those settings, and then open the VoIP trunk's configuration once again and select the "Advanced" tab, configure the following options:
- Codec Preference: PCMU (G.711U) Only
- DID Mode: Request-Line
- Enable Heartbeat Detection: True (Checked)
- Enable Fax Intelligent Routing: Method Depending (If using Fax-From-Web or an FXS configured Fax machine, configure this accordingly.)
See the screenshot below for an example:
SIP NAT/ToS Settings
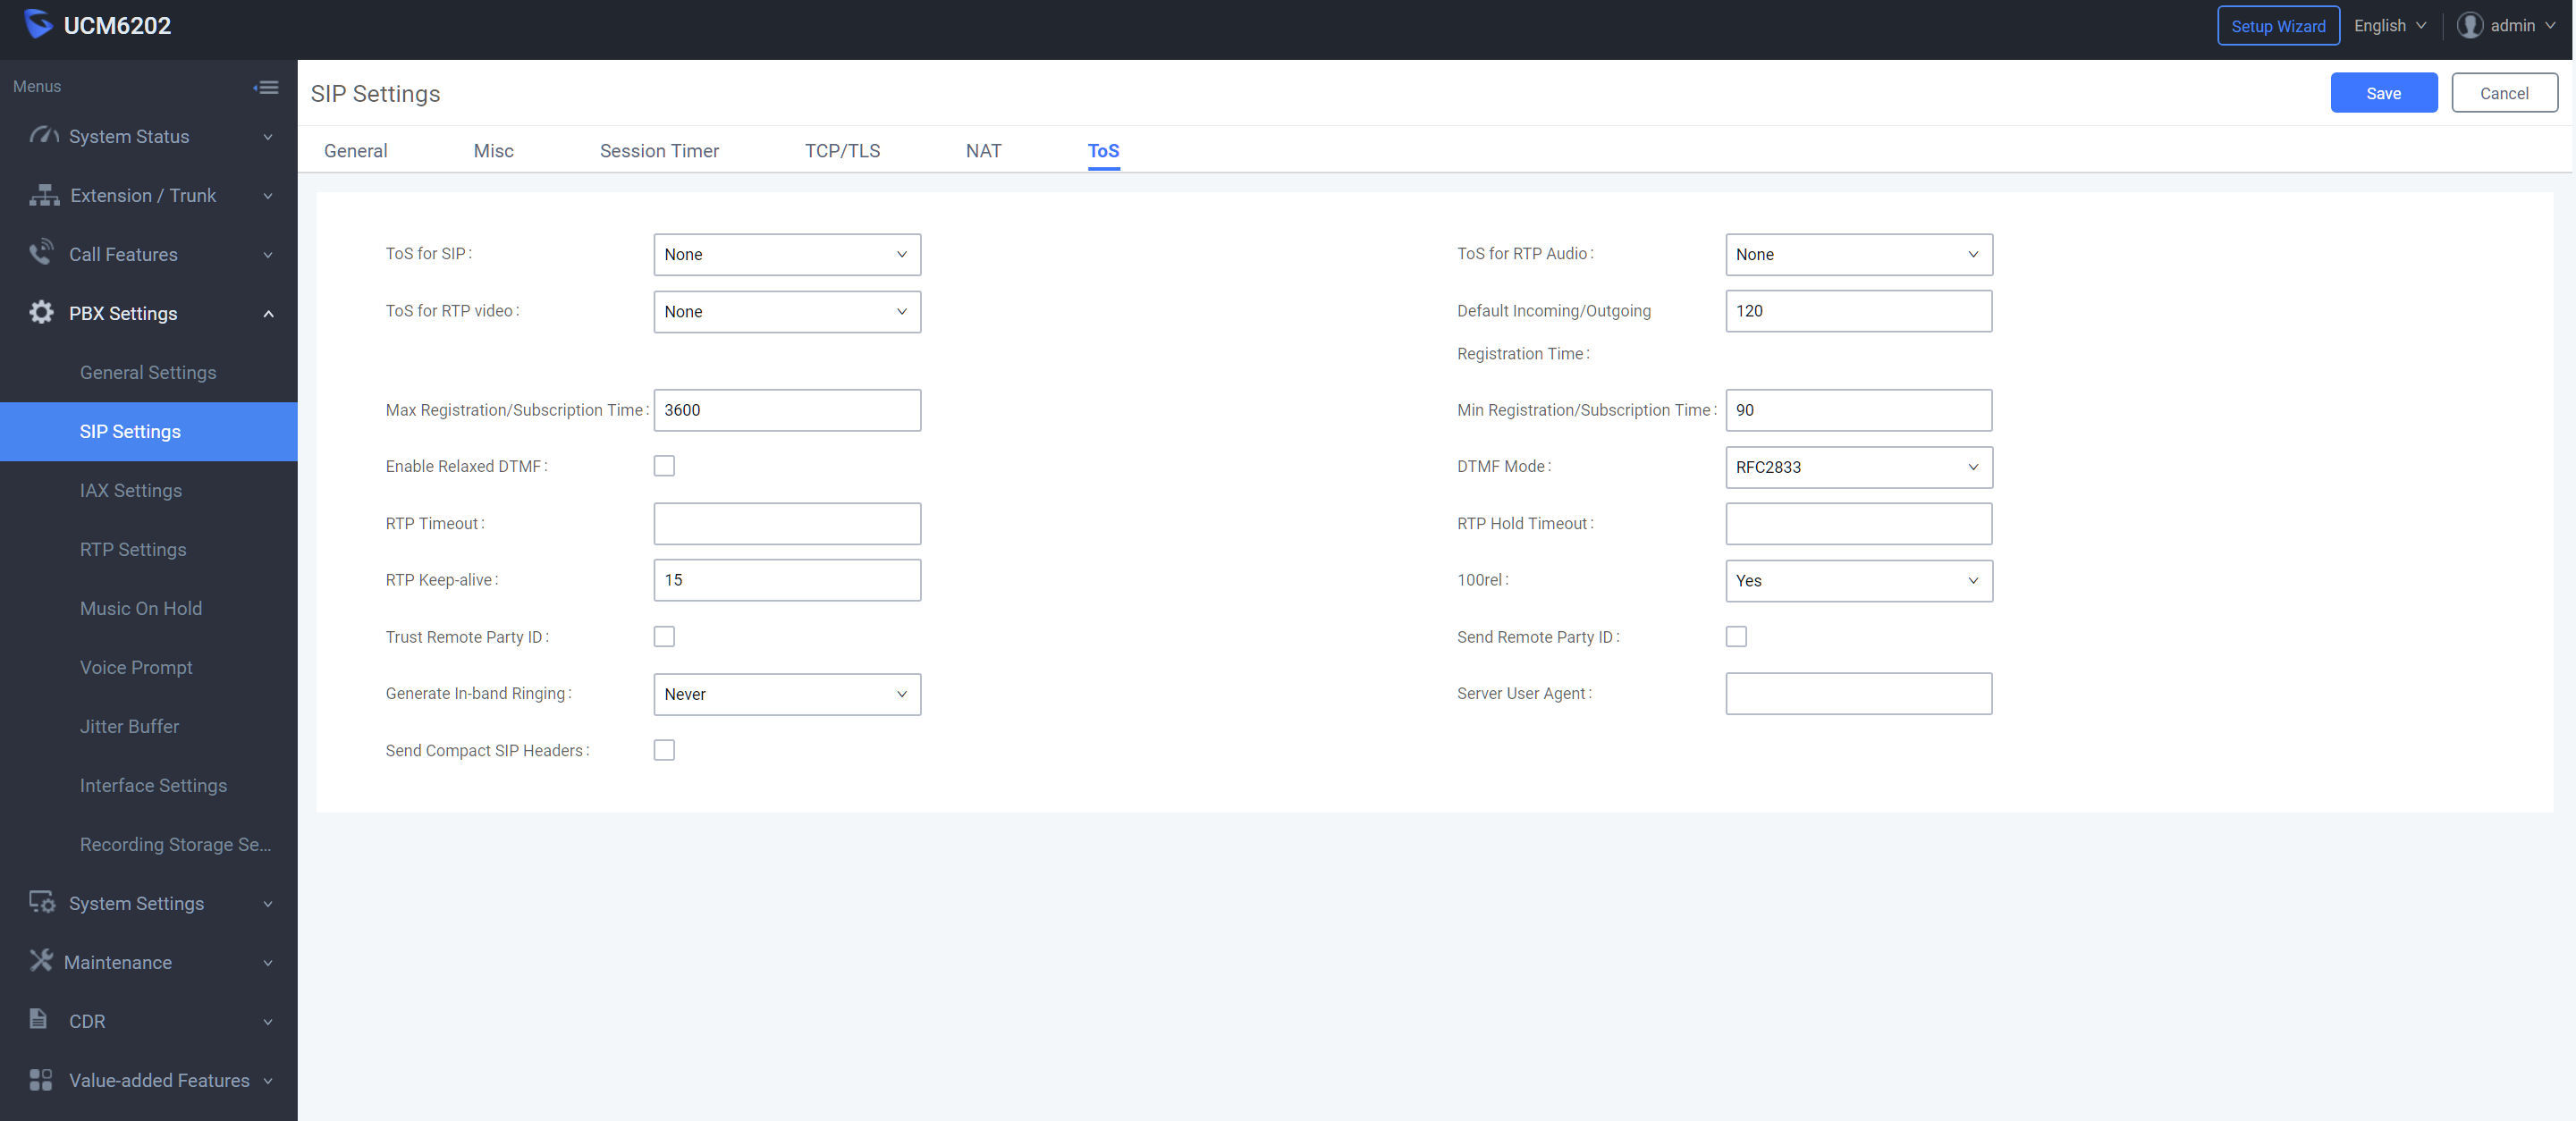
Navigate first to "PBX - SIP - ToS" and configure the following options:
- RTP Timeout: Remove (Remove or set this value as high as possible)
- RTP Hold Timeout: Remove (Remove or set this value as high as possible)
- RTP Keep-Alive: Set Between 15 and 90
See the screenshot below for an example:
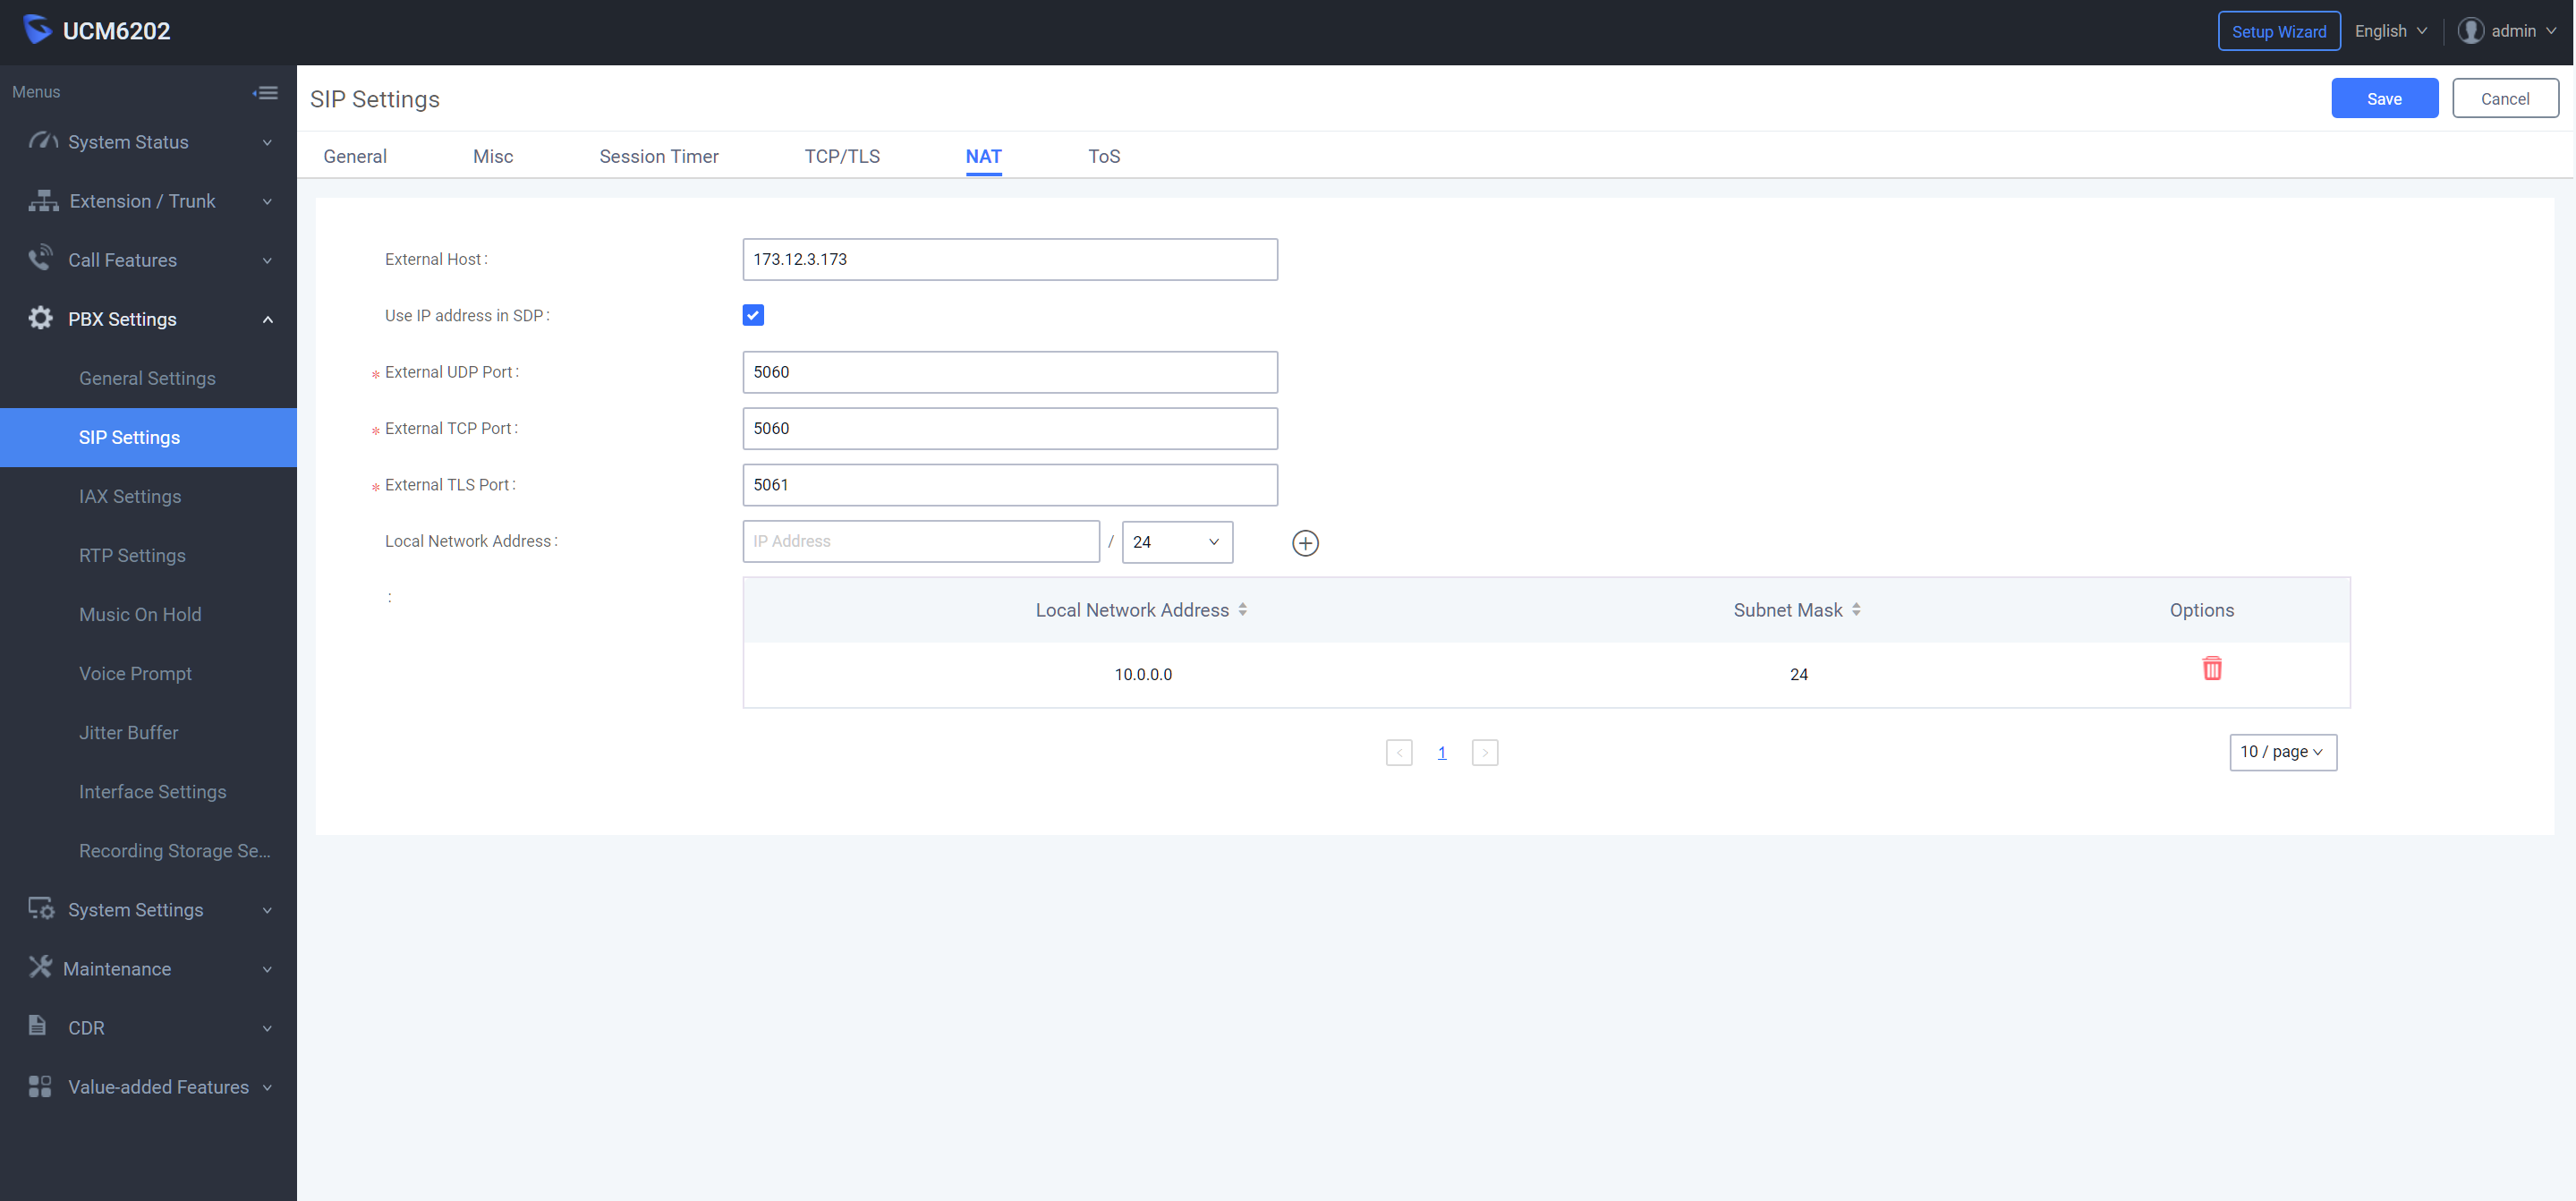
Next, if you plan on setting up a port forward on the firewall, select "PBX - SIP - NAT" and configure the following:
- Local Area Network: 10.0.0.0/24 (Define your Internal network here, this is an example)
- External Host: Define your External/Public IP/Hostname here
See the screenshot below for an example:
T.38 Configuration (Fax Settings)
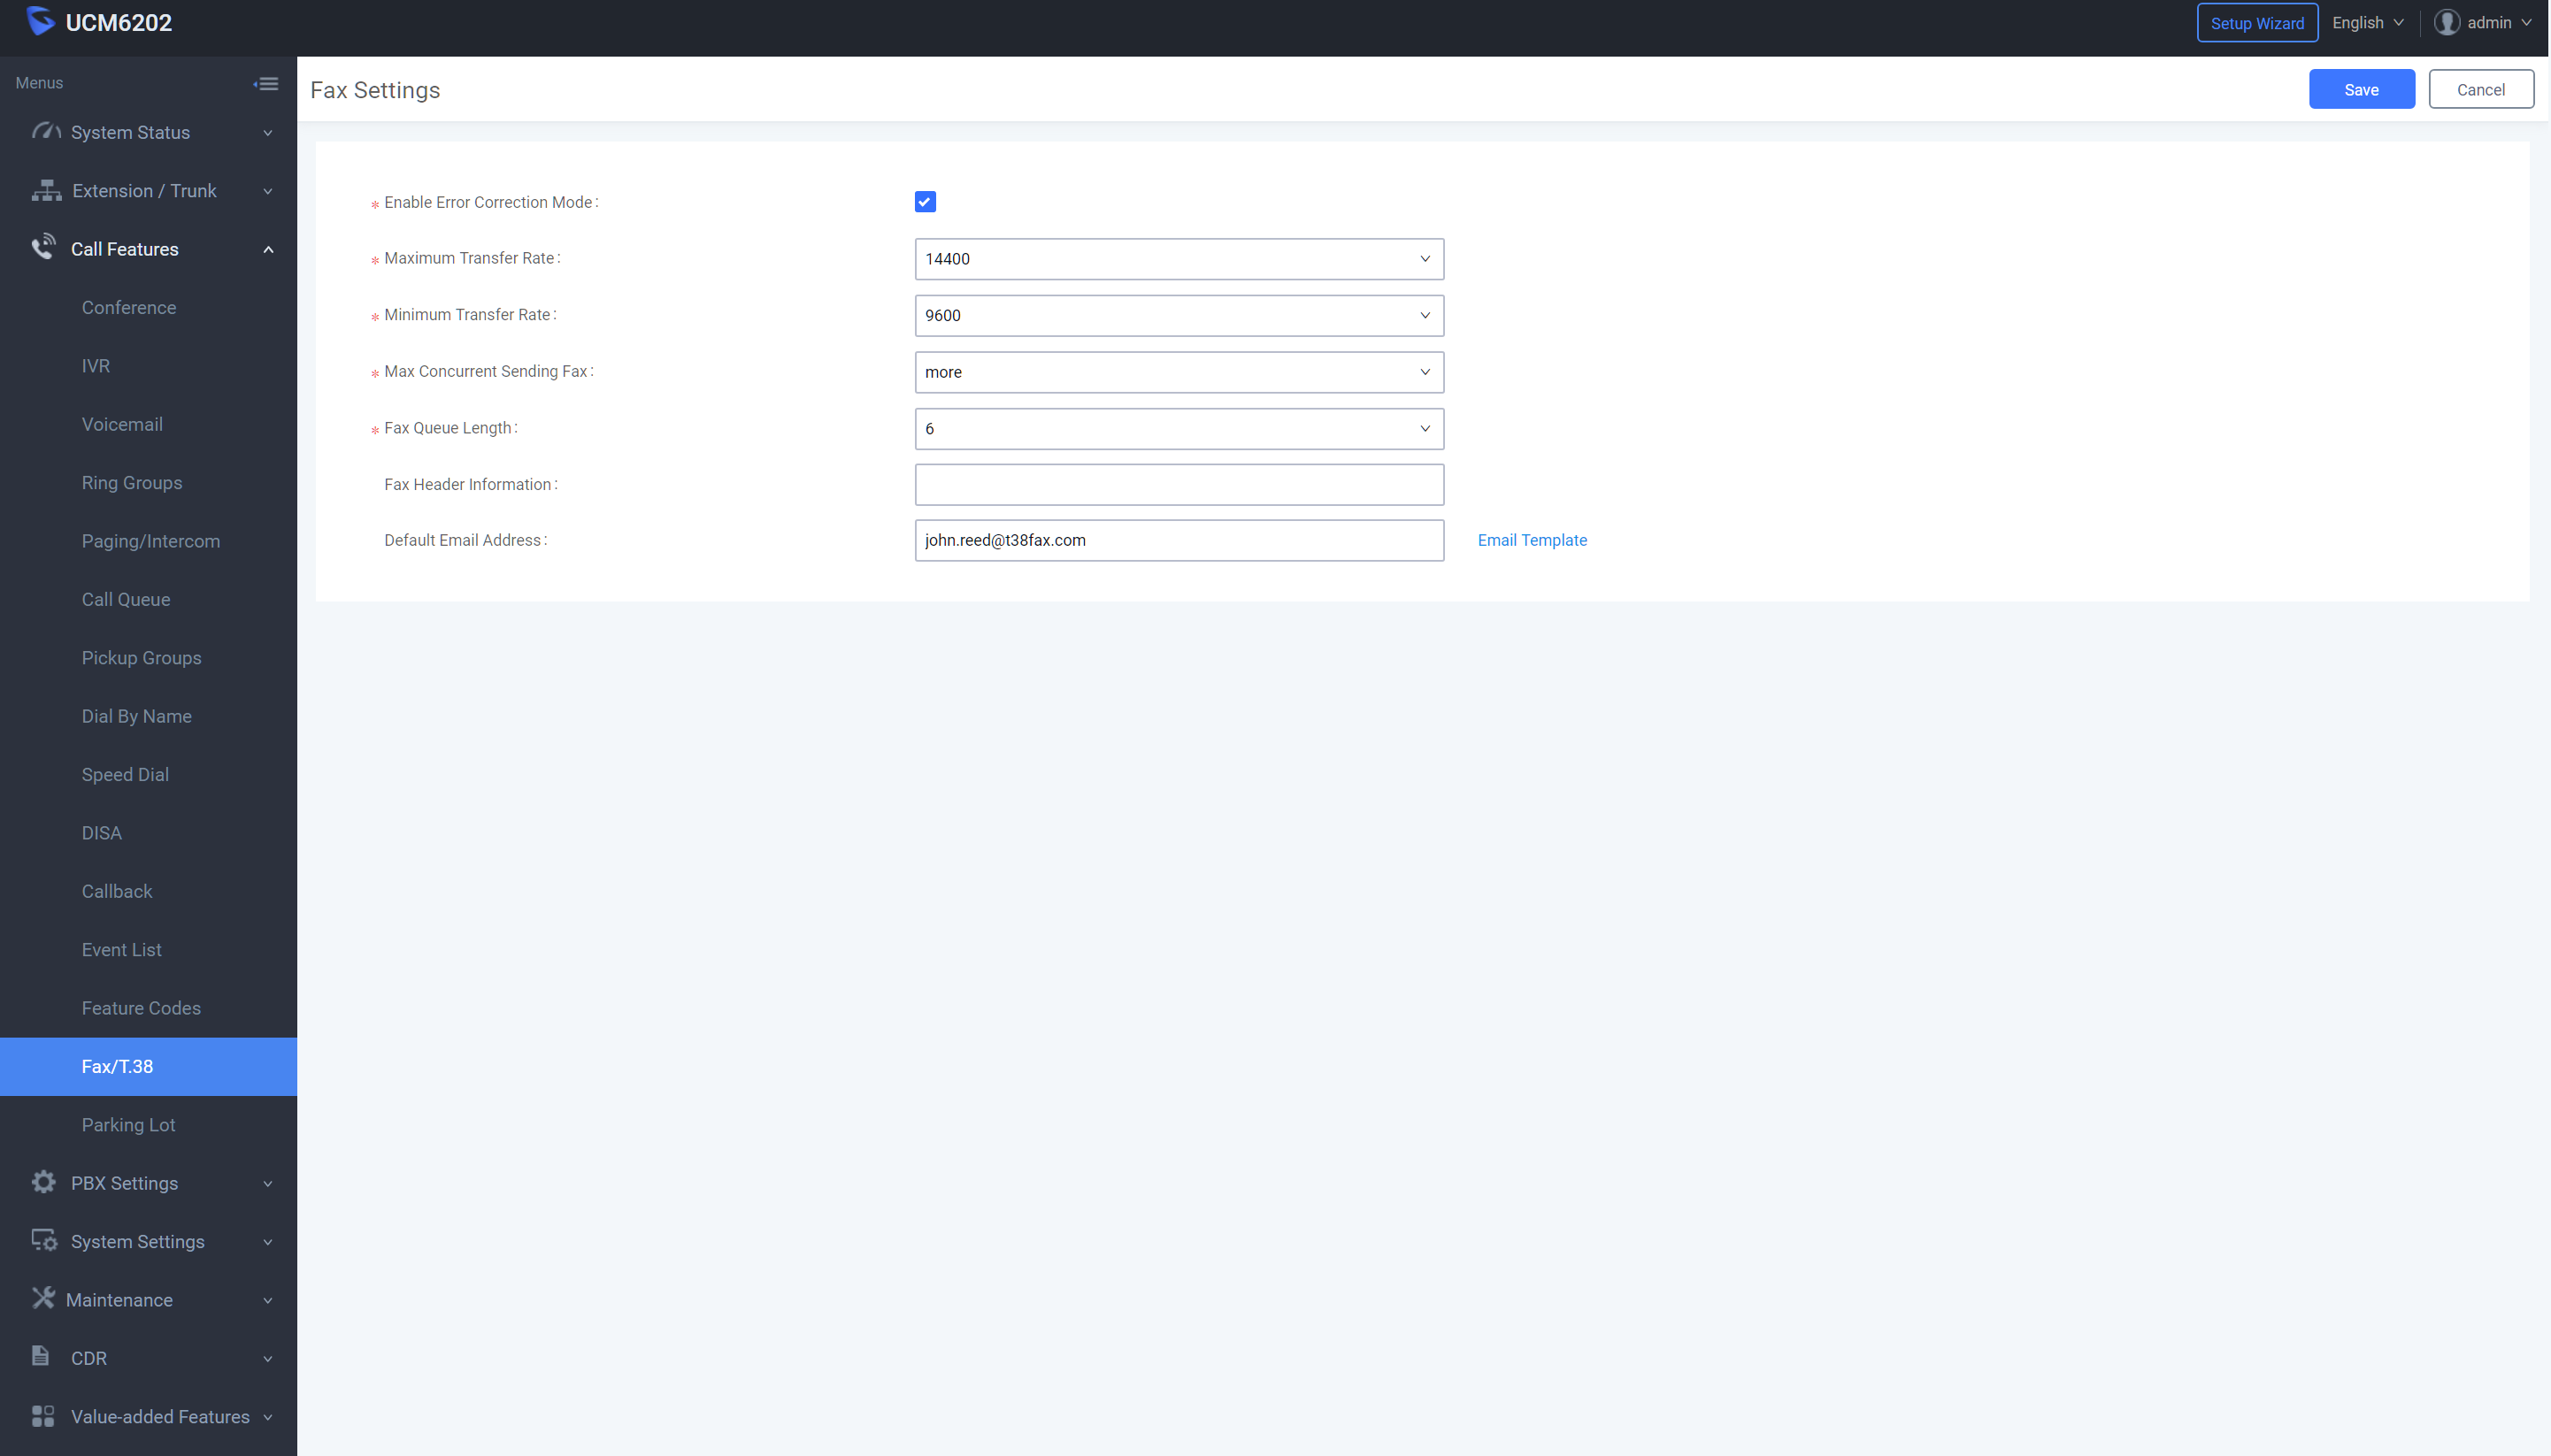
Navigate to "PBX - Internal Options - Fax/T.38" and then click the "Fax Settings" button and configure the following options:
- Enable Error Correction Mode (ECM): True (Checked)
- Maximum Transfer Rate: 14400
- Minimum Transfer Rate: 9600
See the screenshot below for an example, be sure to "Save & Apply" your settings:
Outbound Routes
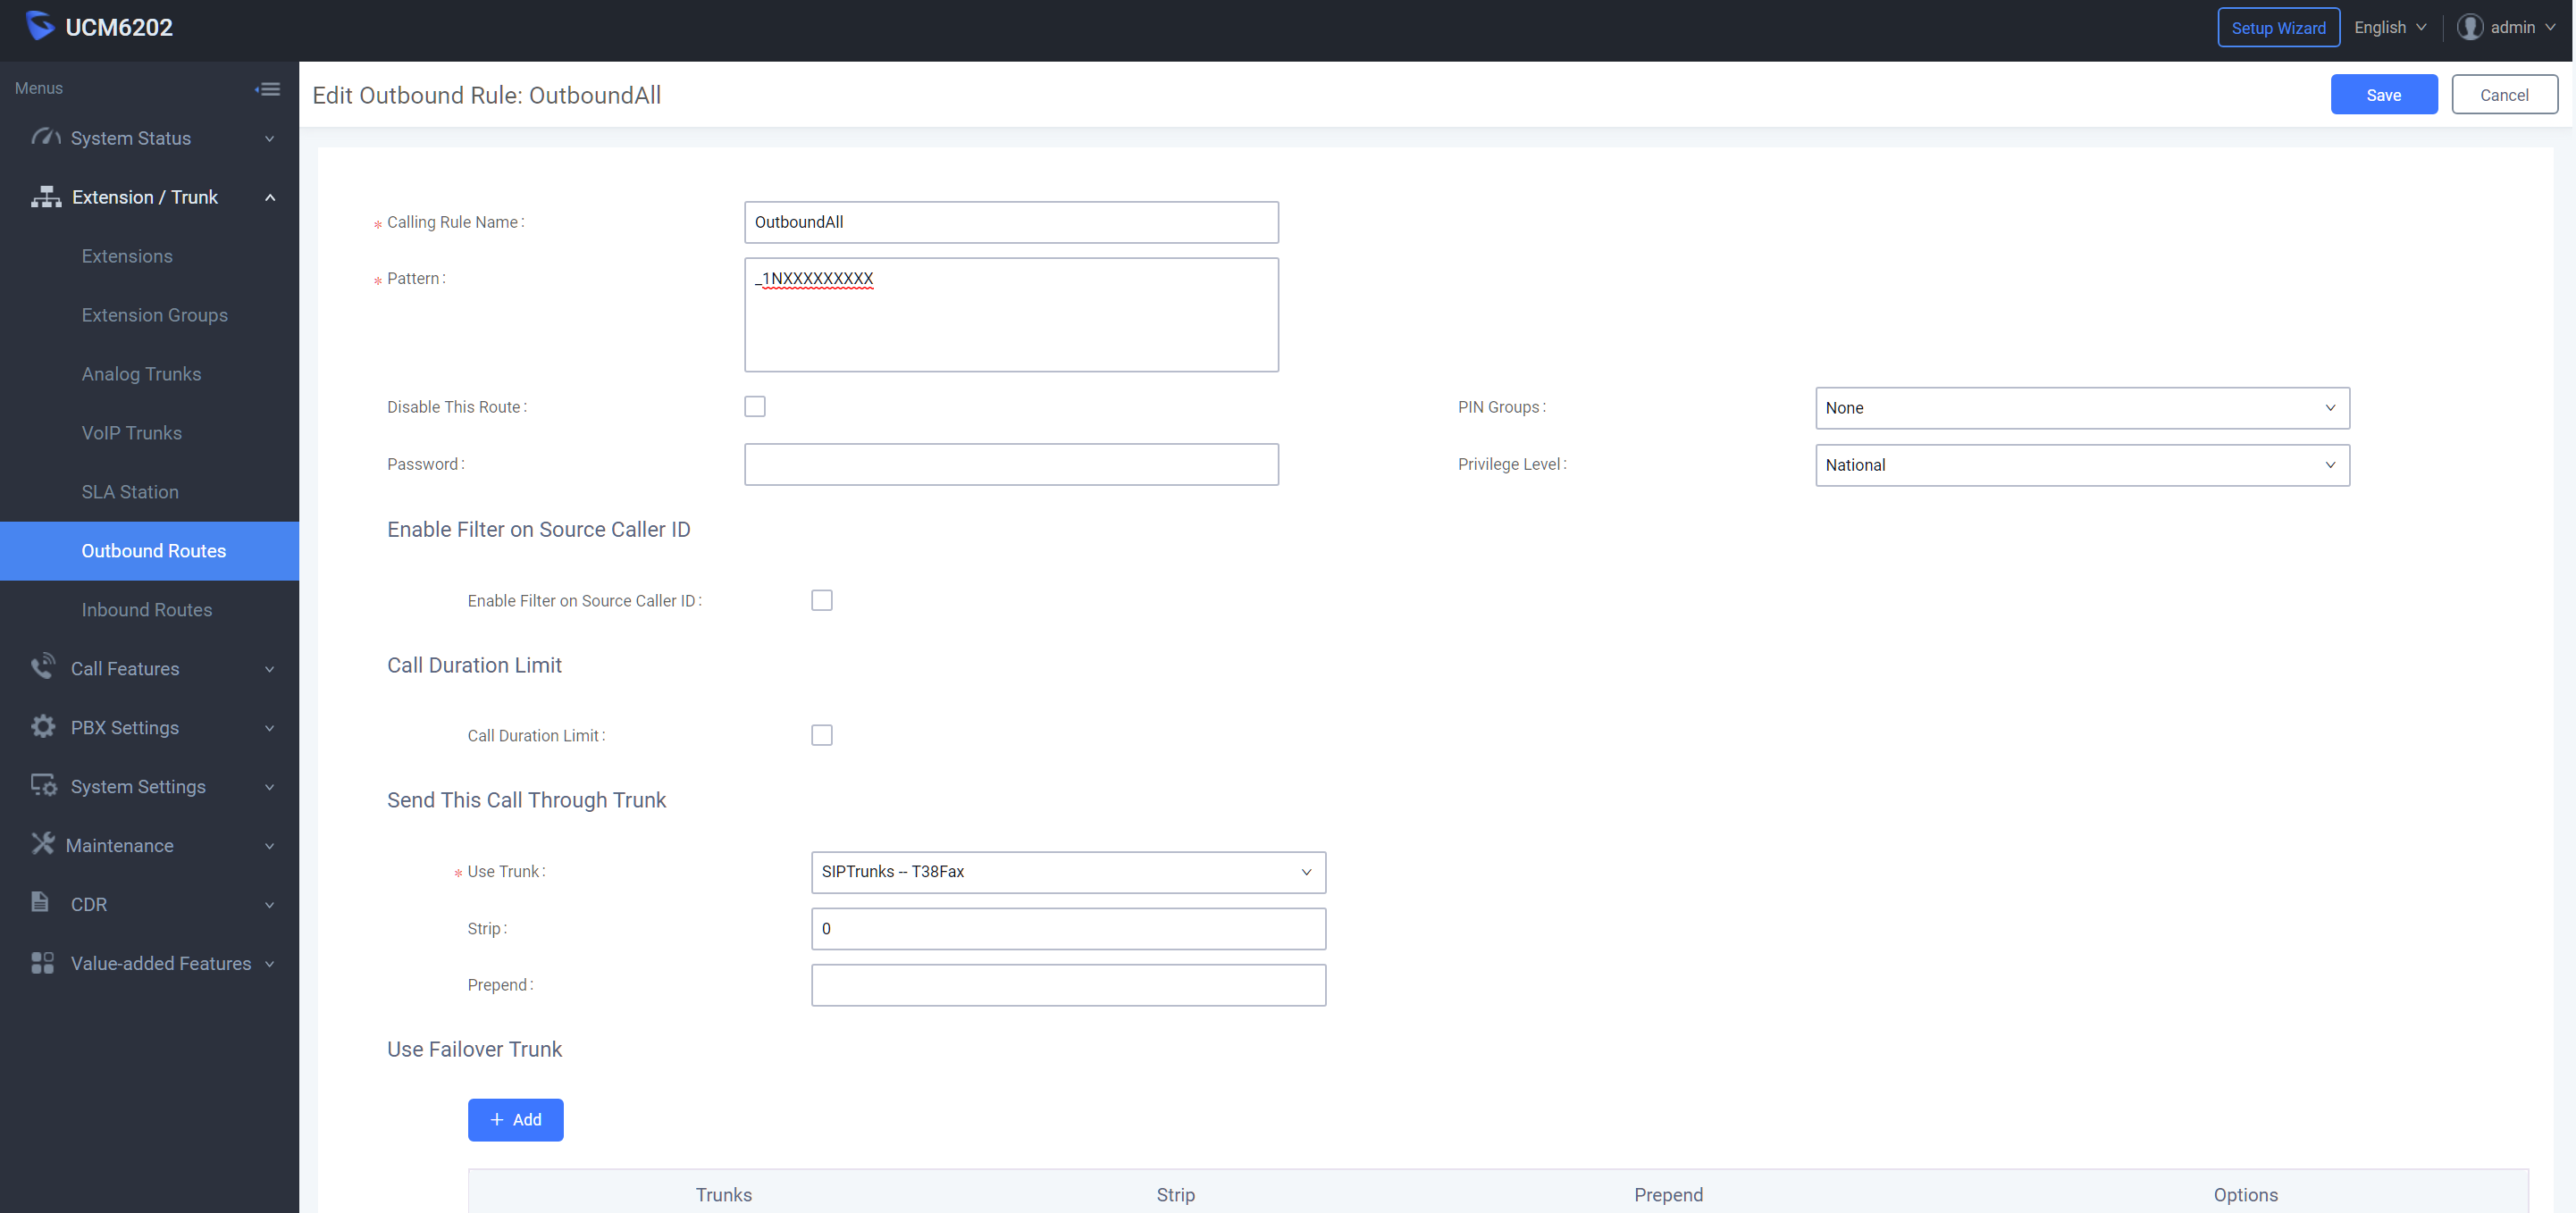
Configure an outbound route for your transmissions to use your T38Fax.com trunk for Fax Transmissions. We will accept 11 or 10 digit strings. The example below sends 11 digits. Navigate to "PBX - Basic/Call Routes - Outbound Routes" and configure the following:
- Calling Rule Name: Outbound-T38Fax
- Pattern: _1NXXNXXXXXX (Customize as required for your deployment)
- Privilege Level: National
- Use Trunk: SIPTrunks - T38Fax (The trunk you created earlier)
See the screenshot below for an example, be sure to "Save & Apply" your settings:
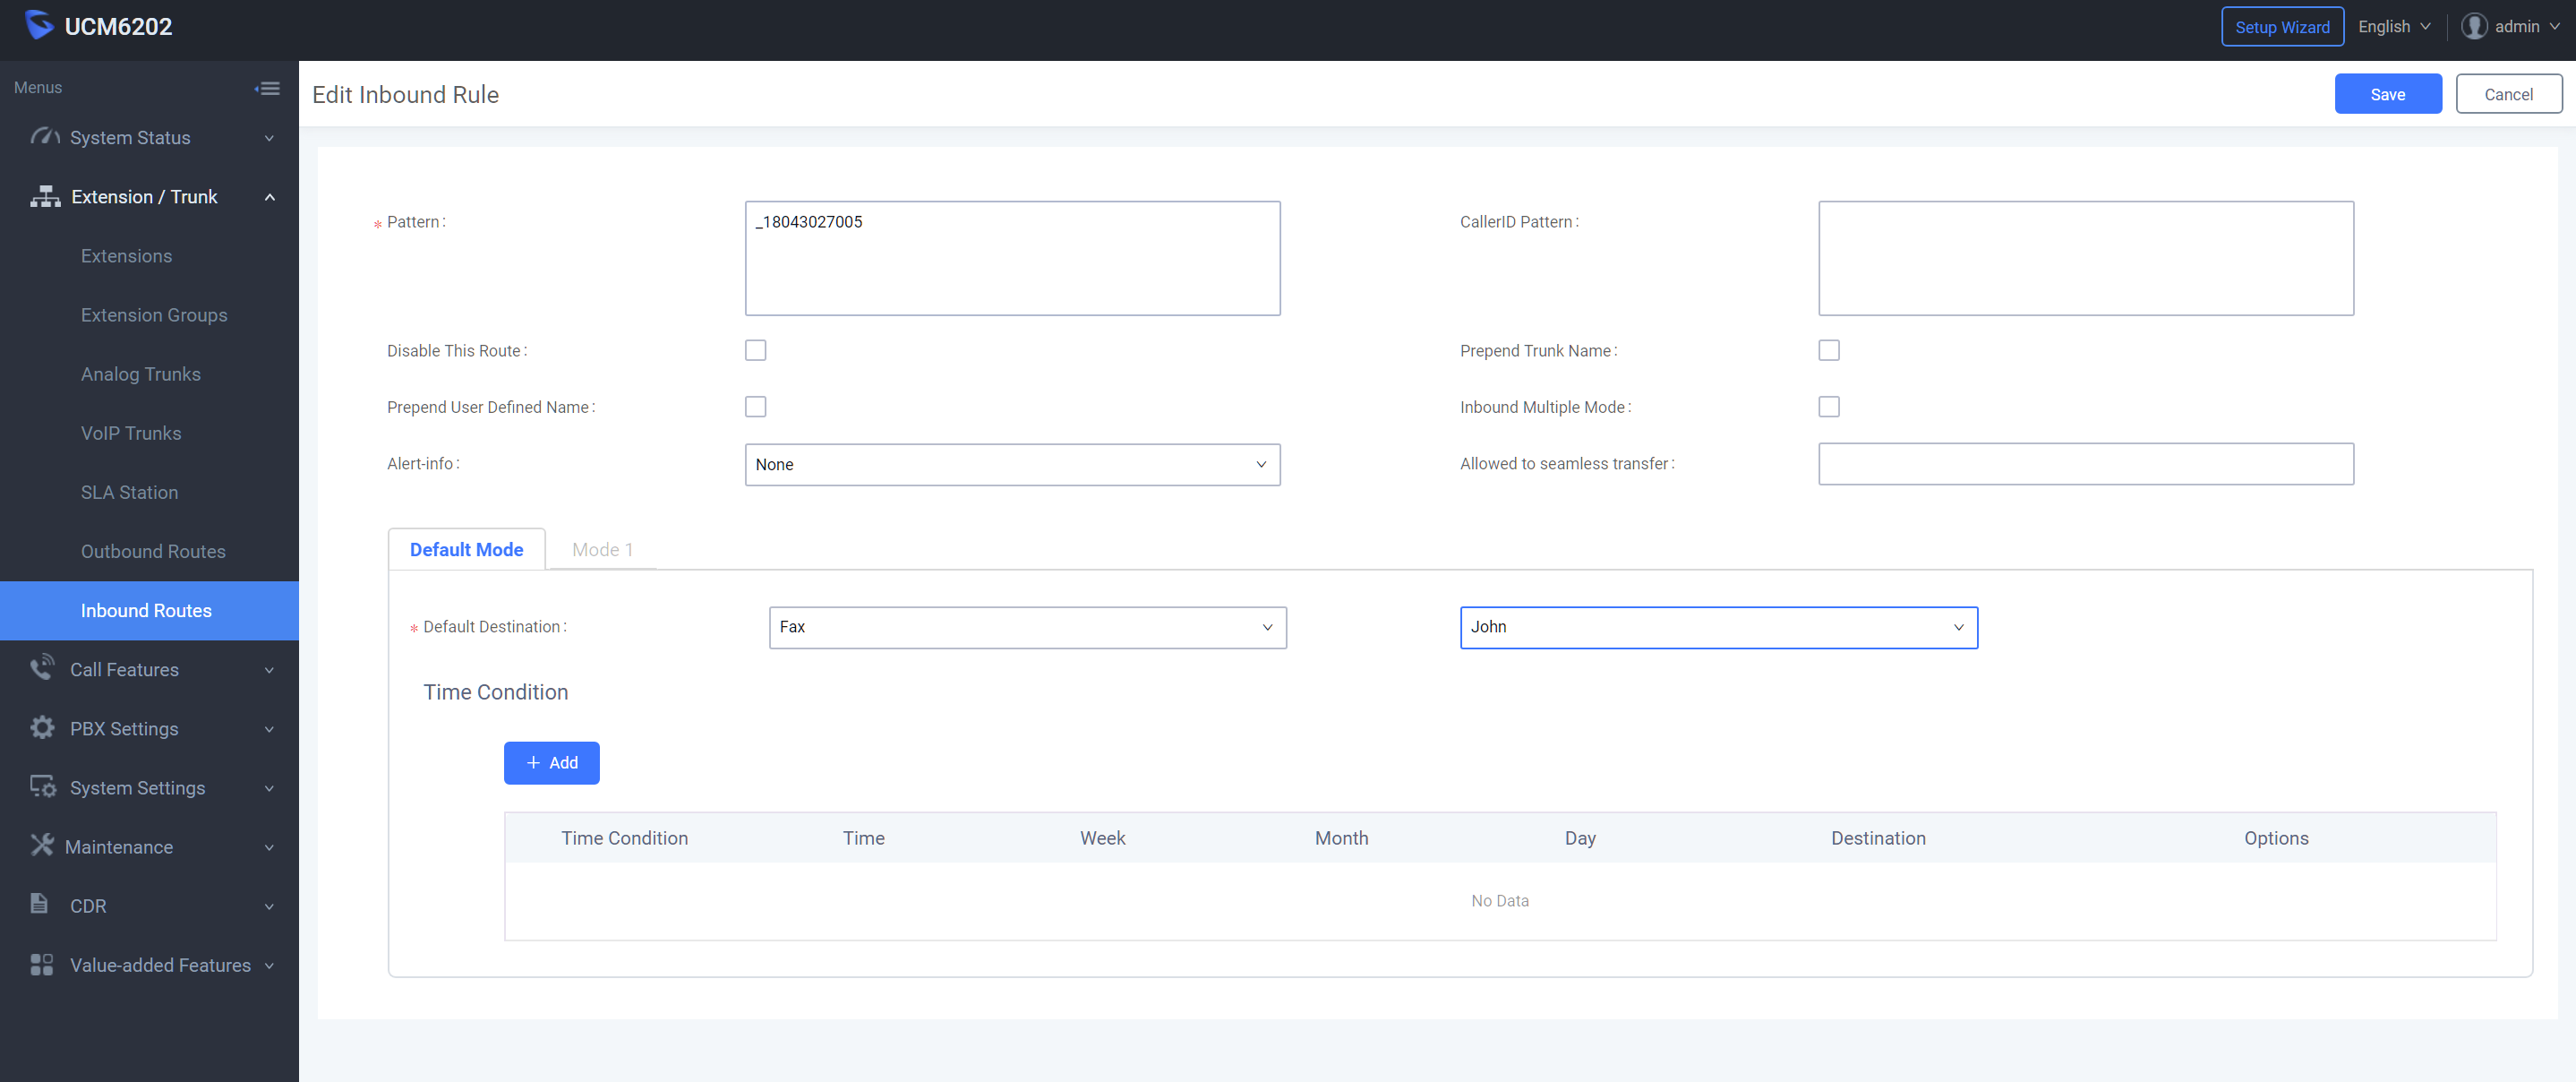
Then, configure an Inbound route to the desired endpoint, navigate to "PBX - Basic/Call Routes - Inbound Routes" and configure the following:
- DID Pattern: _18043027005 (Use your DID, example only. Or use _X! to "Catch All")
Configure any additional settings you may require. See the screenshot below for an example, be sure to "Save & Apply" your settings:
Endpoint Setup
Choose your configuration method:
Fax from Web Configuration
If you're planning to send and receive faxes solely via the UCM6202's Web Interface "Fax Sending" features, no more configuration is necessary! You may wish to set up a "prefix" for your Outbound route to ensure that calls placed from the Web always utilize your T38Fax.com SIP Trunk.
FXS Extension Configuration
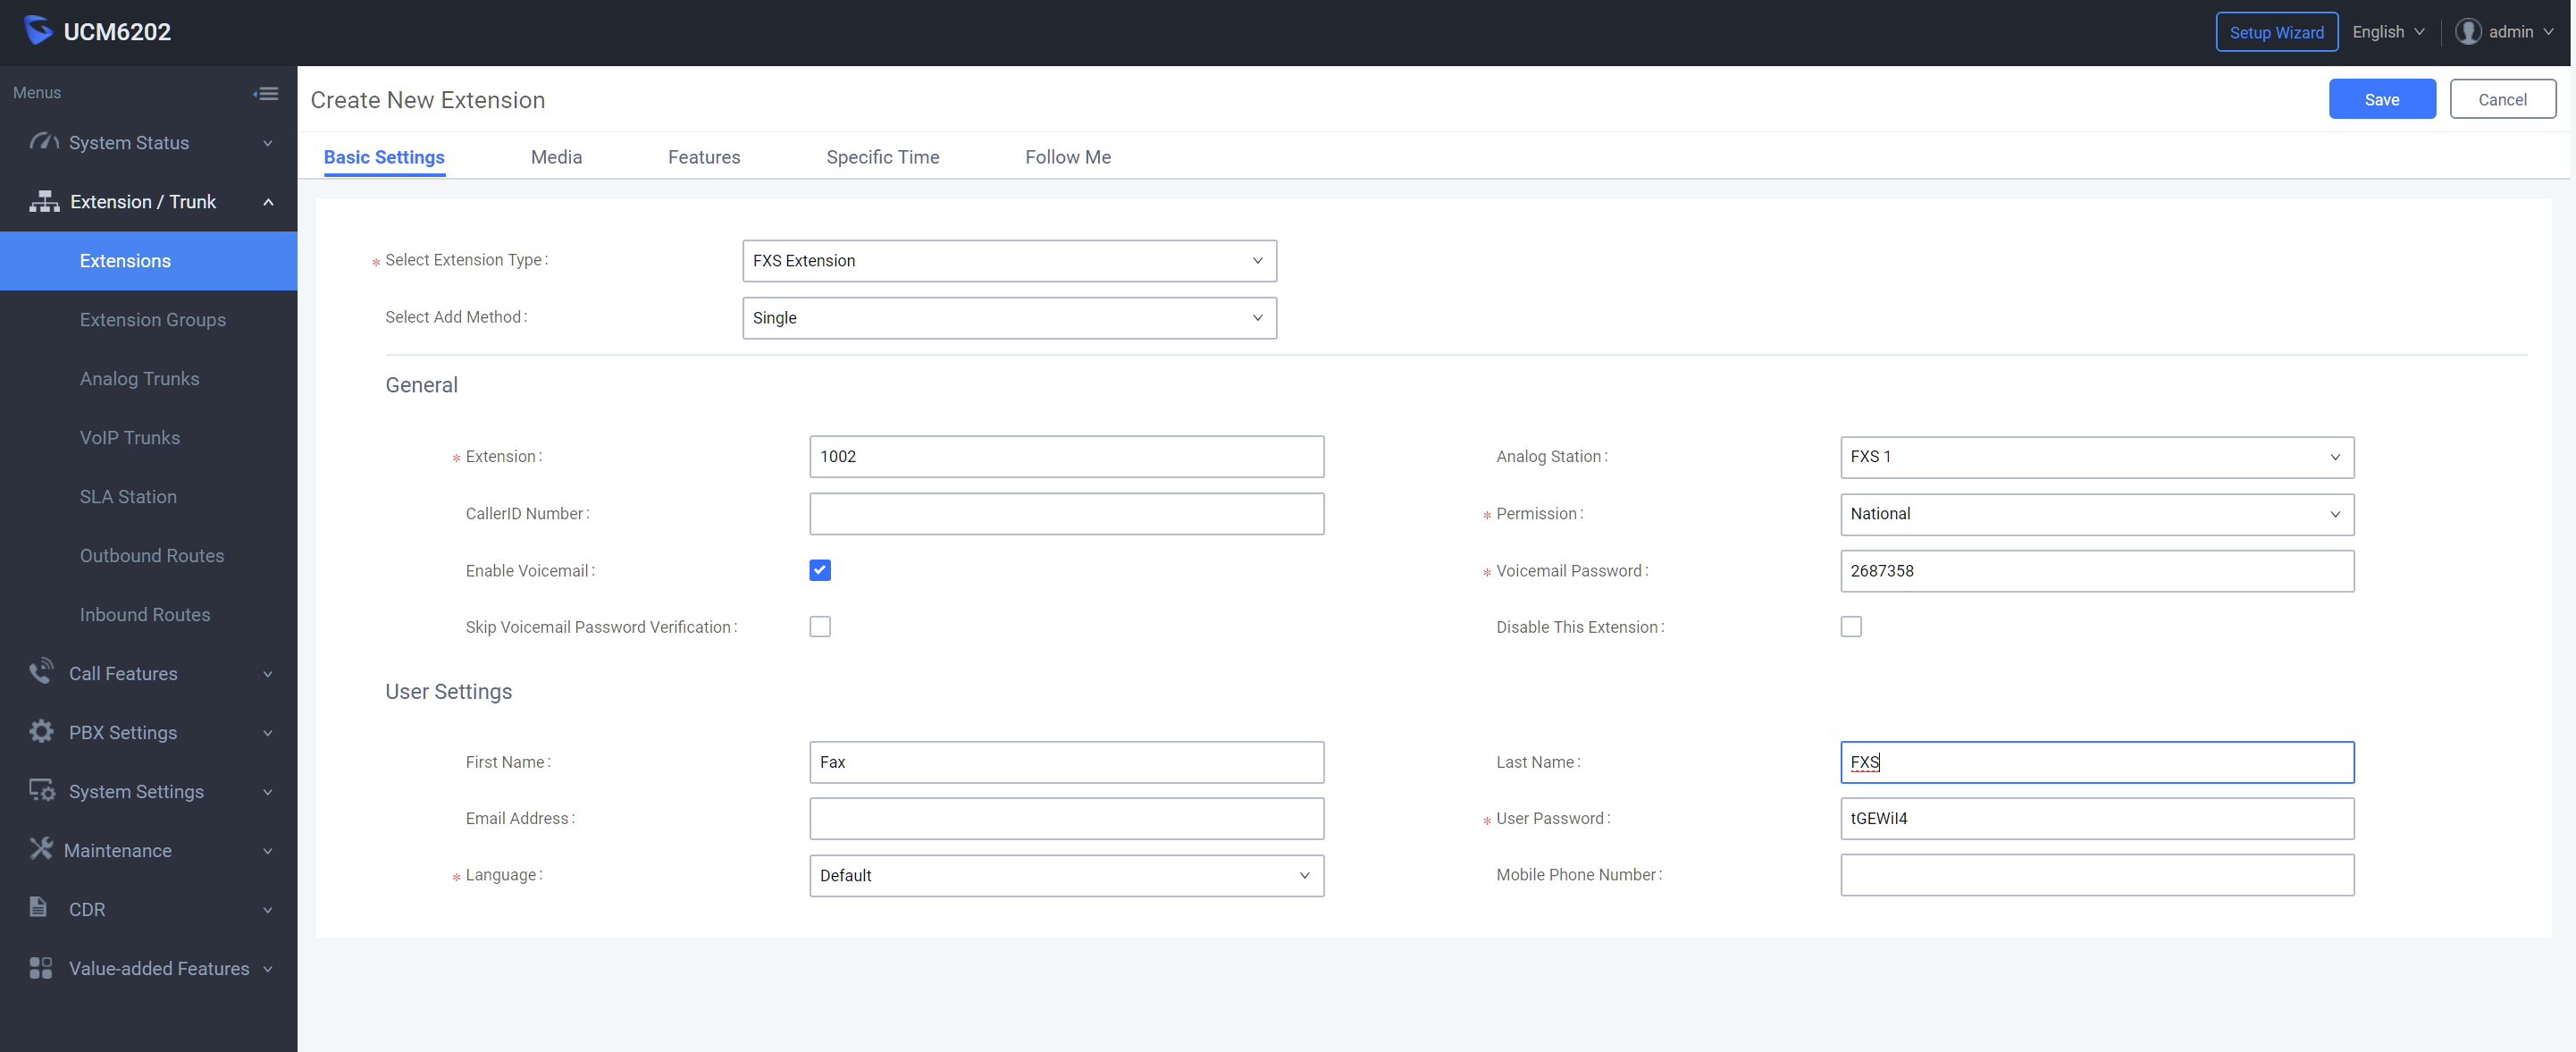
To use a Fax Machine connected to the UCM6202's FXS ports, you'll need to first create an extension under "PBX - Basic/Call Routes - Extensions" and select "Create Extension" from the drop down button. Select "FXS Extension" and configure the following options:
FXS Extension - Basic
- Permission: National
See the screenshot below for an example:
FXS Extension - Advanced
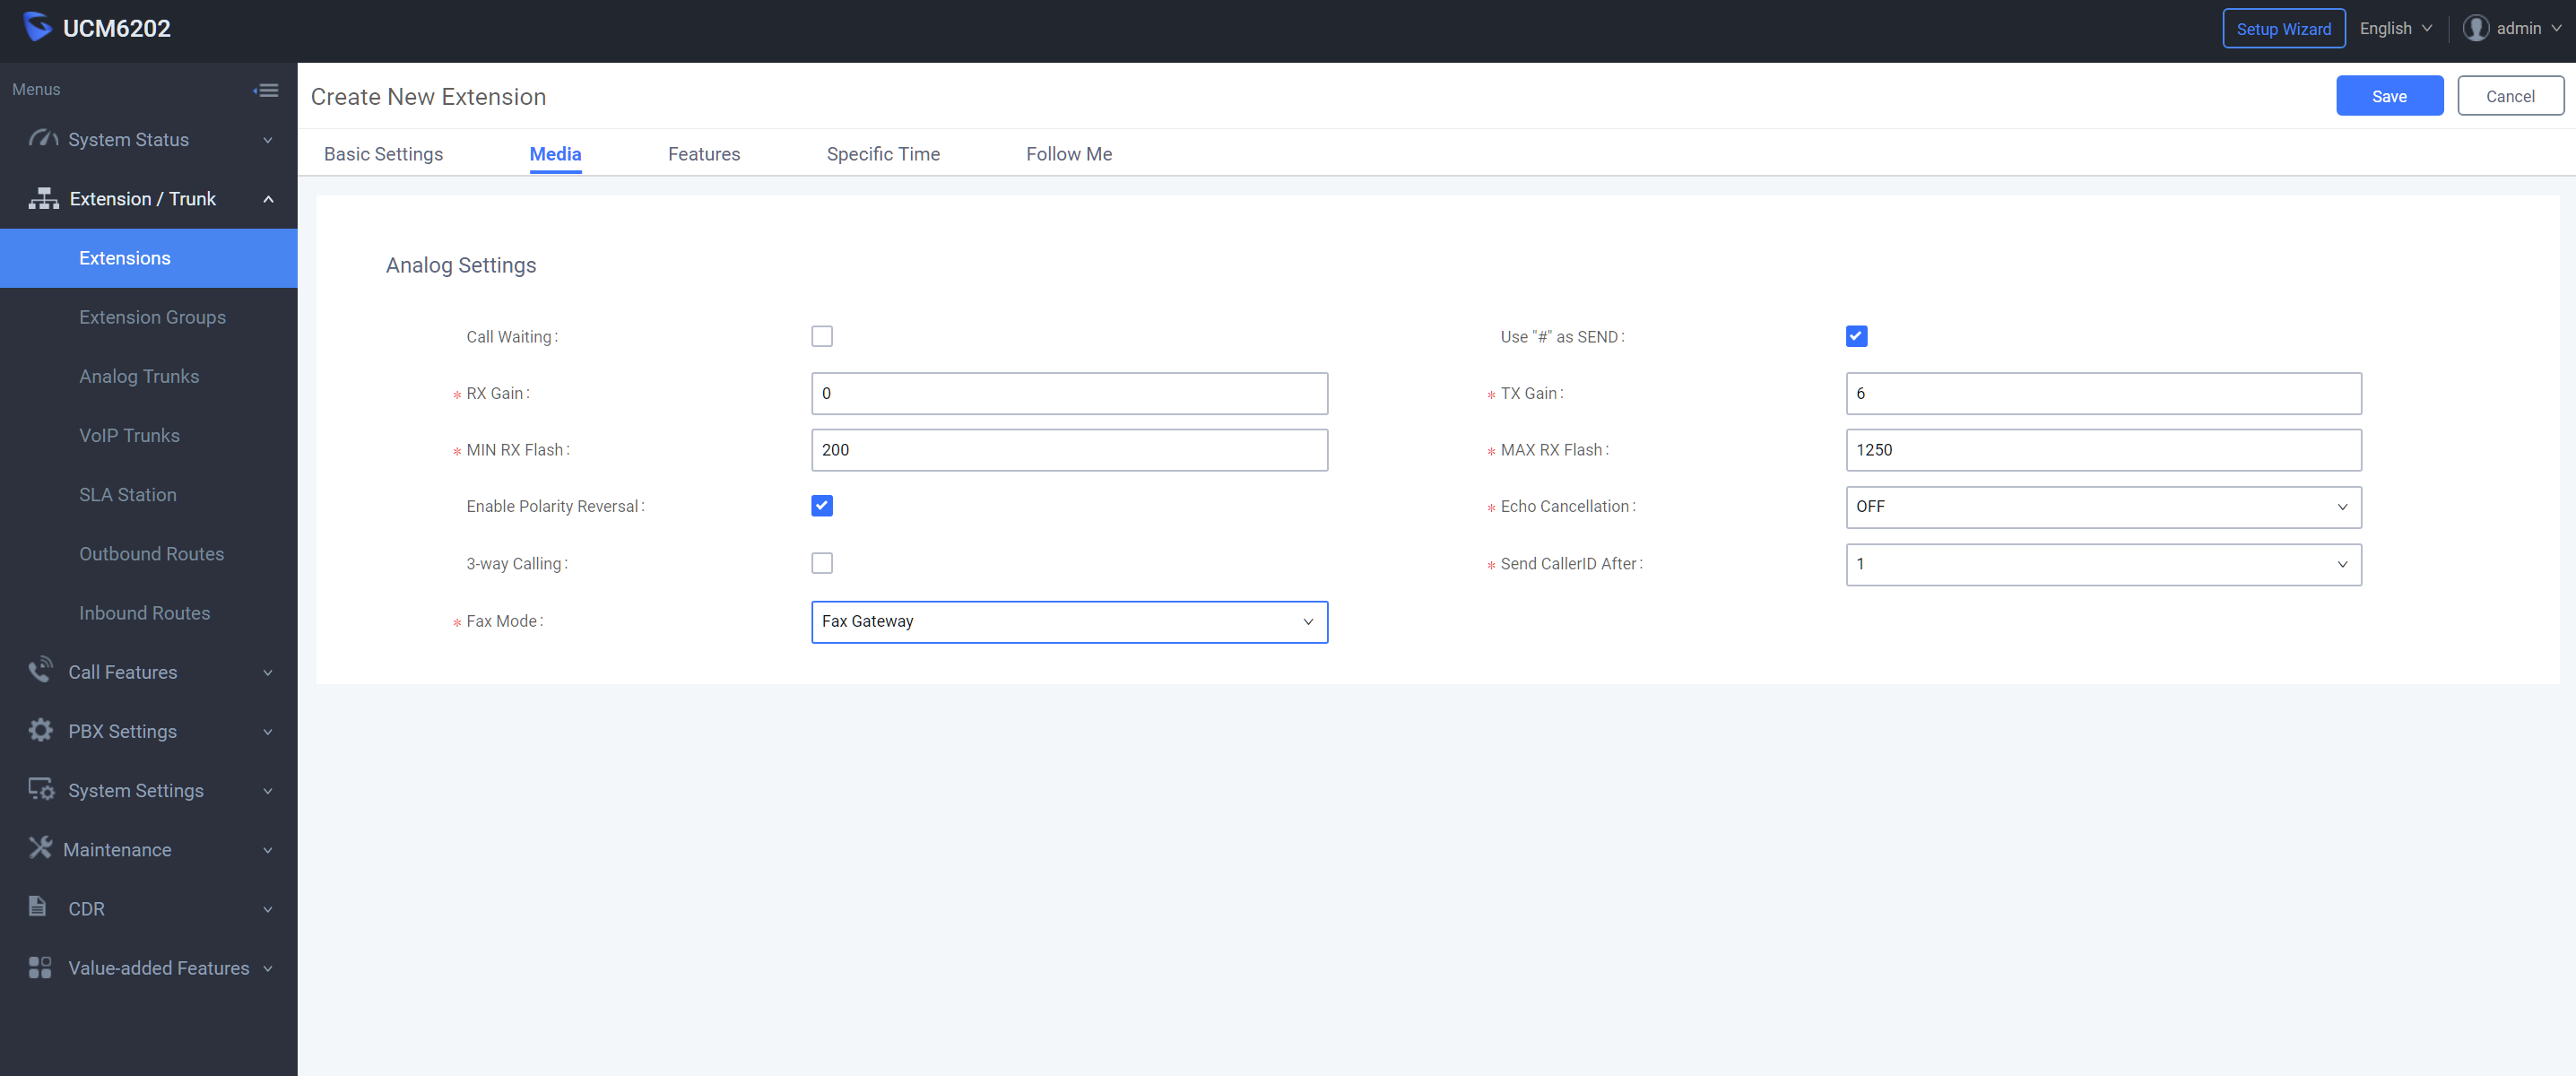
Next, select the "Media" tab of the extension and configure the following:
- Call Waiting: False (Unchecked)
- Fax Mode: Fax Gateway
- TX Gain: 6
See the screenshot below for an example, be sure to "Save & Apply" your settings:
Pass-Thru Configuration to an ATA
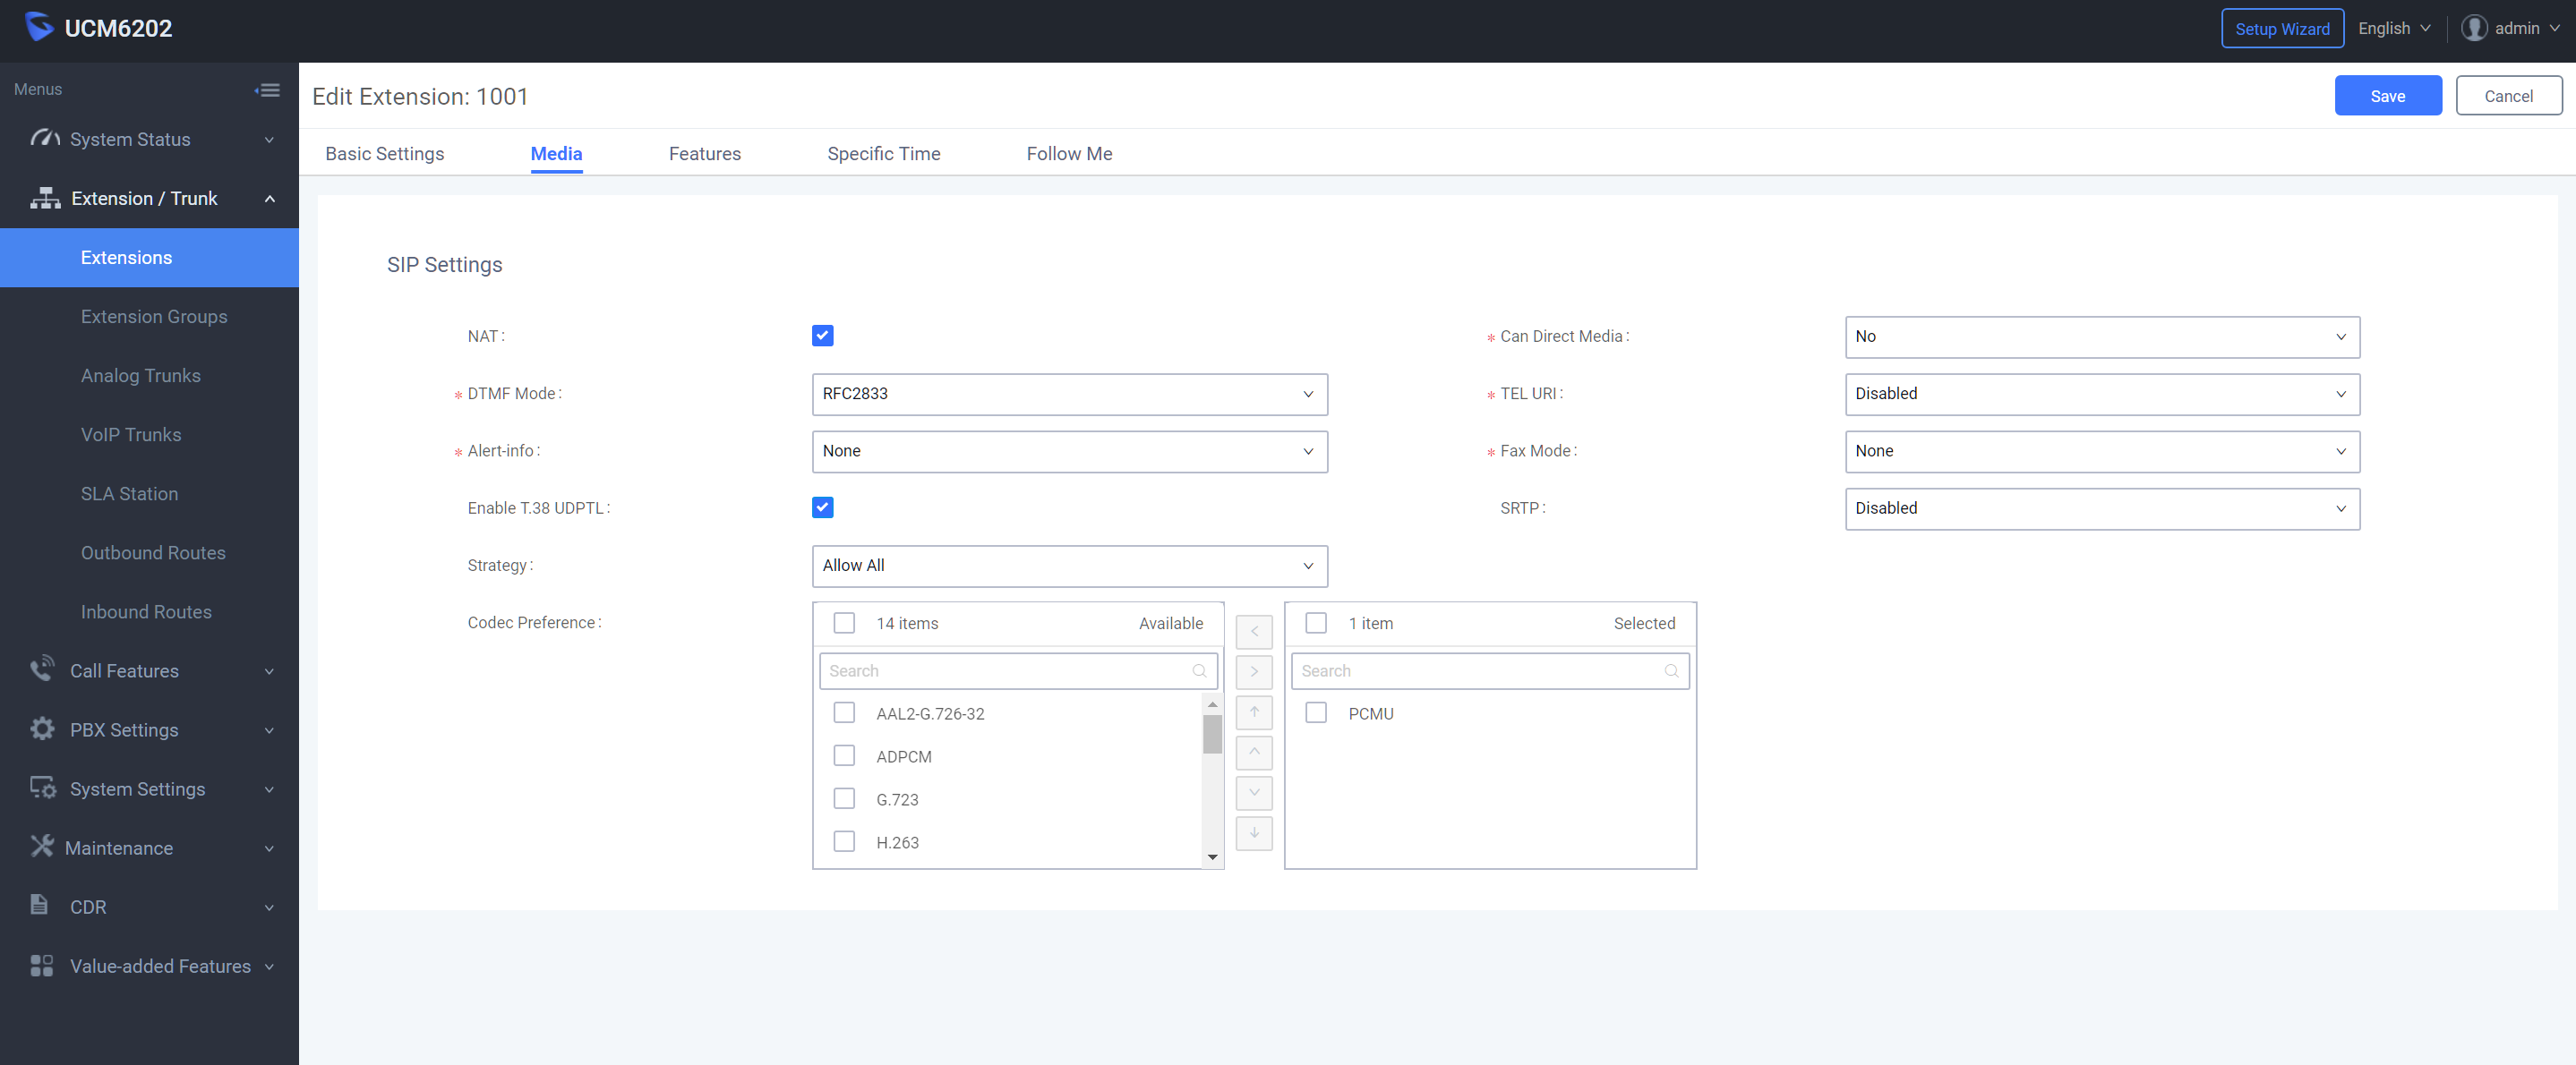
When connecting a fax device to an ATA in Pass-Thru mode, you'll want to ensure that you've configured that ATA per our recommendations found on our certified device's list. (Of course putting the IP of your UCM6202 in place of our sip.t38fax.com hostname.) Once the ATA has been configured, you'll need to configue a SIP extension on the UCM6202 and configure the following options under the "Media" tab:
- Enable T.38 UDPTL: True (Checked)
- Fax Mode: As desired (Fax Detection for email to Fax)
- Can Direct Media: No
- Selected Codecs: Remove all but PCMU (G.711U)
See the screenshot below for an example, be sure to "Save & Apply" your settings:
Remember, depending on which method you've chosen to connect your account, you'll need to make adjustments in permission levels, routing destinations, and perhaps even trunk/route fax detection options. As always, be sure to double check your work, and after you've finished your configuration give the device a Cold Reboot to ensure that no configuration options were missed/unwritten. Once you've verified your setup, be sure to follow the last step and configure your fax machine.
Fax Machine
Configure your fax machine to work properly with your Power-T.38 SIP Trunk. Review our Recommended Fax Machine Settings for details.
As always, should you have any problems with this configuration, feel free to reach out to our Engineering team so that they can help you quickly diagnose and repair any errors to get you back up and faxing in no time!
Comments
0 comments
Please sign in to leave a comment.