Introduction
XCAPI is a virtual FoIP modem that supports the T.38 protocol. Fax server software is required to attach to the modem to provide a complete fax solution. Some examples of fax servers that use XCAPI are listed below.
- GFI FaxMaker (unknown status)
- FaxBack NetSatisFAXtion (unknown status)
- ActFax Fax Server (supported)
- Imecom Fax Server (unknown status)
- CopiaFacts (unknown status)
This guide provides instructions on how to create two XCAPI controllers on a single server: one for inbound and one for outbound, but sharing a single NIC and a single IP-authenticated T38Fax trunk. This separation of inbound and outbound controllers and trunks is required to use XCAPI with T38Fax trunks reliably with registration auth. Consequently, in order for your fax server to work correctly with T38Fax, your fax server must be configurable to use only one XCAPI controller, the outbound controller, for outbound faxes. Additionally, channel licensing for these controllers is separate: in the course of this guide, the channel count will be defined individually for inbound and outbound and these channels cannot be shared between the controllers. You can change the channel allocations later, but this will require manual intervention by your system administrator.
Configuring the T38Fax Trunks
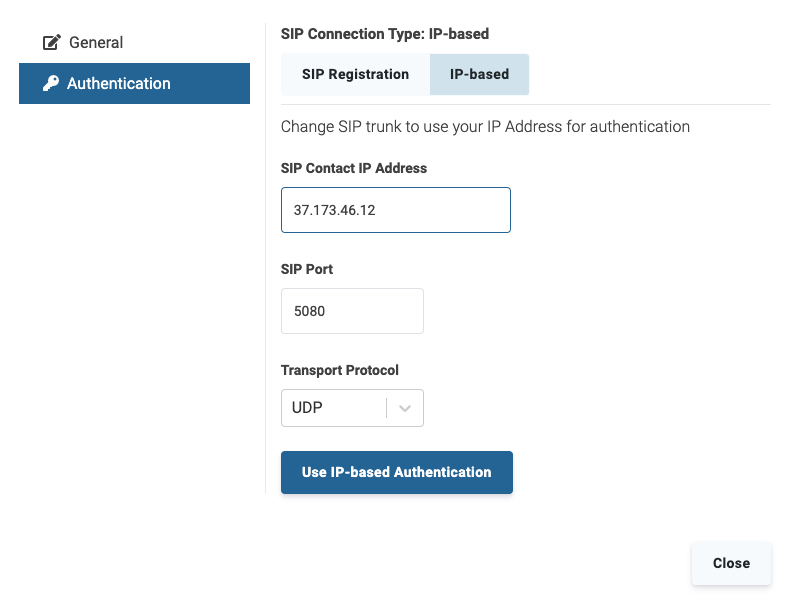
In the T38Fax portal at https://my.t38fax.com, create a single trunk using IP-based authentication. Use the following information when setting up the trunk:
- SIP Contact IP Address: [your server's public IP address]
- SIP Port: 5080
- Transport Protocol: UDP
After configuration, the trunk settings should look as below:
NOTE: You will need to open and forward UDP port 5080 (for the inbound controller) and in some cases UDP port 5081 (for the outbound controller) on your firewall's external interface to UDP ports 5080 and 5081 on your server, respectively. See our Recommended Firewall Settings article for more information. We recommend forwarding these ports now to the best of your ability as your firewall may not easily release the port mappings for the controllers after they've already been established.
Provisioning the Inbound Controller
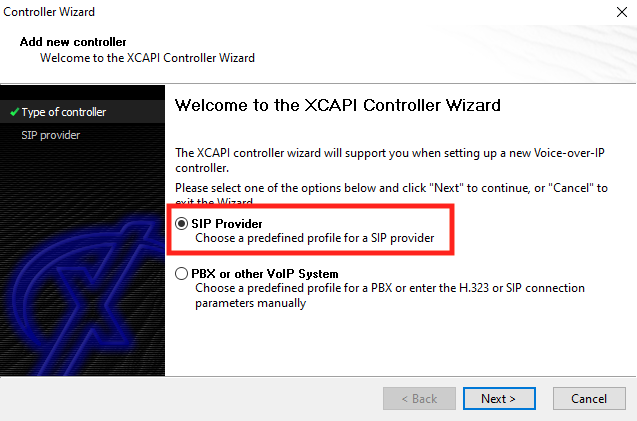
After you've installed XCAPI, the XCAPI Configuration application should launch and open the XCAPI Controller Wizard automatically. The XCAPI Controller Wizard is what we use to add our controllers. We'll start with the inbound controller.
From the first page, select SIP Provider and click Next >.
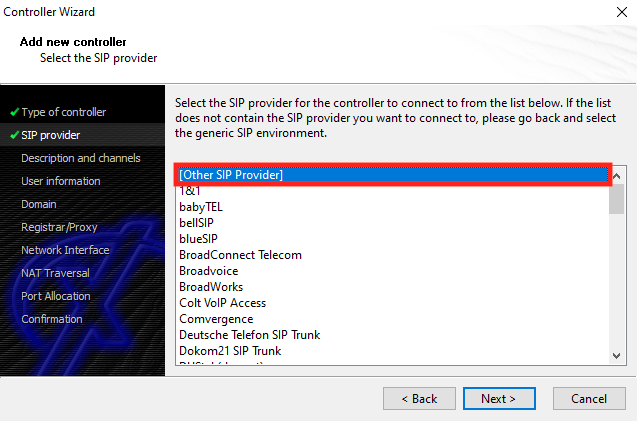
From the SIP Provider section, select [Other SIP Provider] and click Next >.
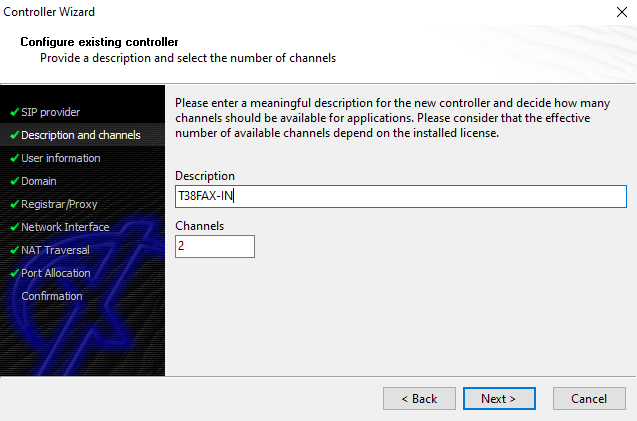
In the Description and Channels section, enter T38FAX-IN as the Description so we know this will be our inbound controller. Next, enter the number of channels you want to have for inbound calls. If you've licensed your channels already, make sure the channel count you've entered here is is less than the total number of channels you've licensed. If you haven't purchased any licensing, the demo licensing comes with four channels. Here we've chosen two channels so that we can split the total number of demo licensed channels evenly between the inbound and outbound controllers. Once you've filled out these fields, hit Next >.
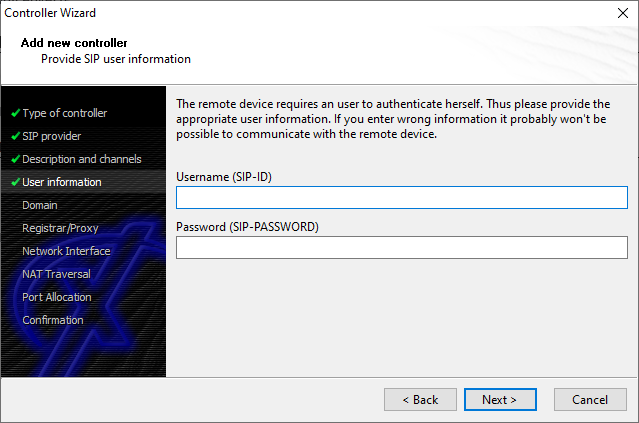
Since we are using IP authentication, we can leave the User Information section blank. Click Next >.
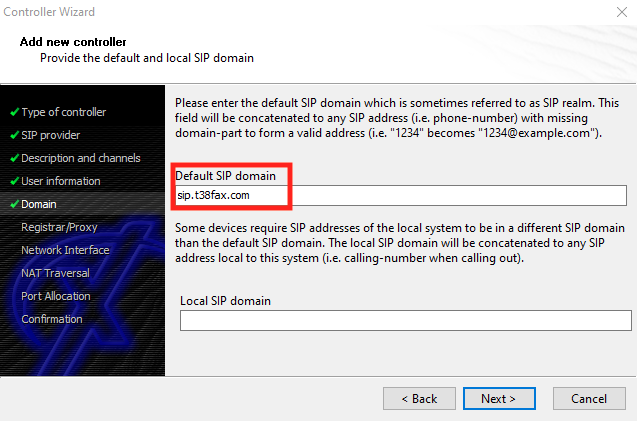
In the Domain section, for the Default SIP domain enter sip.t38fax.com. Click Next >.
In the Registrar/Proxy section, check the Proxy box. This will unblock the proxy section's text boxes. Enter sip.t38fax.com in the left text field and leave the right text field Default. Leave the Registrar section unchecked and blank.

In the Network Interface section, select an IPv4 network interface. This choice is unique to each server. Here, we've went with Ethernet instead of Ethernet 2. Be sure not to select an IPv6 interface or Loopback Pseudo-Interfaces. Make your selection and click Next >.

In the Nat Traversal section, click Next >. Do not alter selection from Don't use NAT traversal technique, even if your server is behind a NAT device.

At the Port Allocation section, click Next >.

Provisioning the Outbound Controller
The outbound controller is set up much the same way as the inbound controller, but note that there are differences so be sure to follow this section of the guide closely.
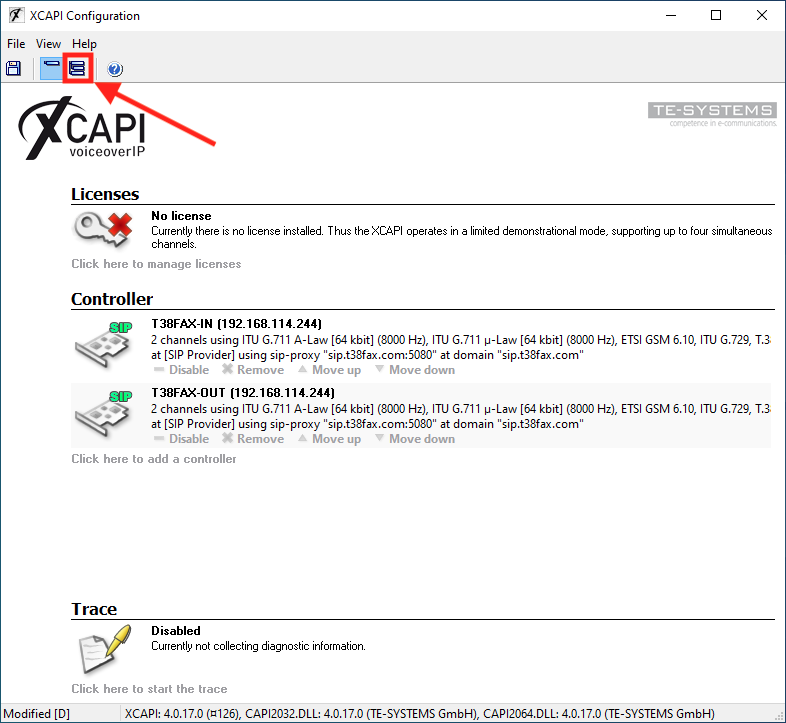
To get started, relaunch the XCAPI Controller Wizard by selecting Click here to add a controller at the bottom of the main page's Controller section.

The XCAPI Controller Wizard will appear. From the first page, select SIP Provider and click Next >.
From the SIP Provider section, select [Other SIP Provider] and click Next >.
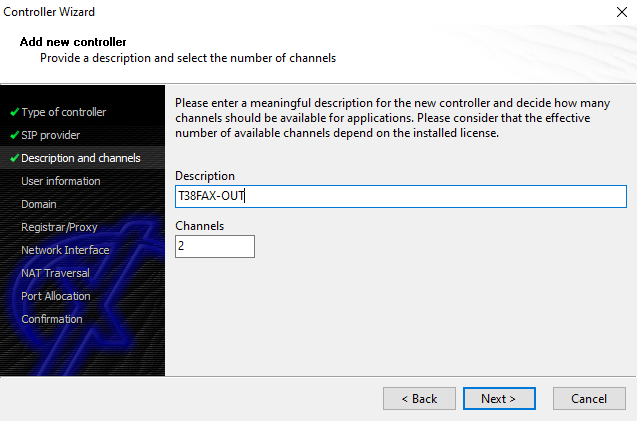
In the Description and Channels section, enter T38FAX-OUT as the Description so we know this will be our outbound controller. Next, enter the number of channels you want to have for outbound calls. We've already selected how many channels we want to use for inbound calls so we can subtract the inbound channel count from our total licensed channel count to get the number we should put in this field. Since the demo license comes with four channels total and we've used two for inbound, we've allocated the other two here. Once you've filled out these fields, hit Next >.
Again, since we are using IP authentication, we can leave the User Information section blank. Click Next >.
In the Domain section, for the Default SIP domain enter sip.t38fax.com. Click Next >.
In the Registrar/Proxy section, check the Proxy box. This will unblock the proxy section's text boxes. Enter sip.t38fax.com in the left text field and 5080 in the right text field. Leave the Registrar section unchecked and blank.

In the Network Interface section, select an IPv4 network interface. Here we have a choice. We can either use the same interface as the inbound controller and configure our controllers to use different UDP ports later or we can select different interfaces and use the same port later. We've opted for using the same network interface in this guide since not all servers may have more than one network interface. Be sure not to select an IPv6 interface or Loopback Pseudo-Interfaces. Make your selection and click Next >.
In the Nat Traversal section, click Next >. Do not alter selection from Don't use NAT traversal technique, even if your server is behind a NAT device.
At the Port Allocation section, click Next >.
Preparing for Configuration
Some additional configuration is required before the controllers are usable with a T38Fax trunk. Switch from the Default View to the Expert View by clicking the three-element icon in the top left corner.
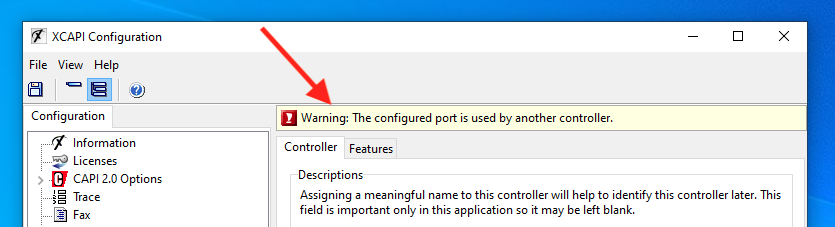
During configuration, you will sometimes see a pastel yellow banner as shown below, informing you that there is an overlap between port usage by the controllers. This banner will disappear during the configuration process.
As with the provisioning steps, the steps for the inbound and outbound controllers are different so be sure to follow the whole guide through instead of repeating the inbound controller's steps twice.
Configuring the Inbound Controller
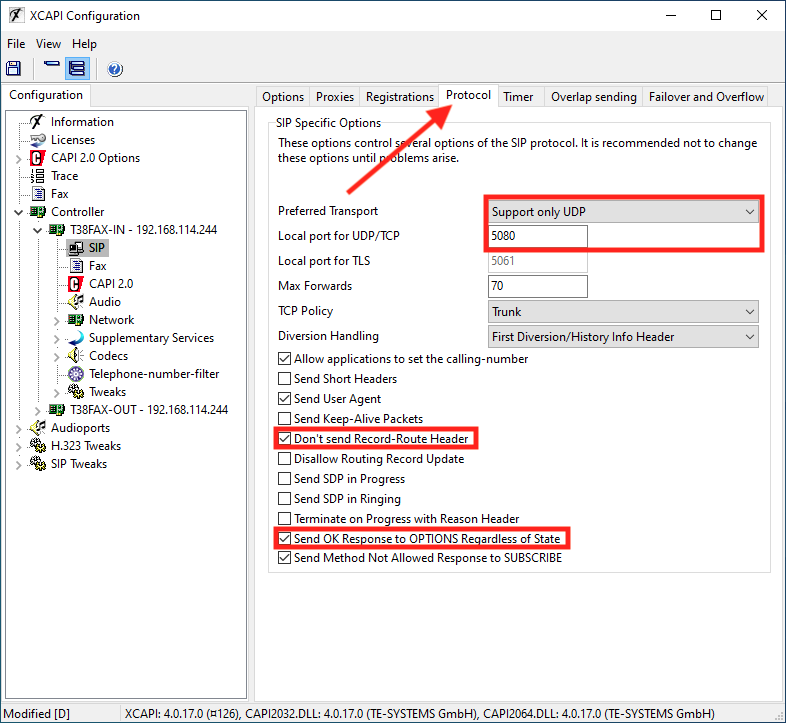
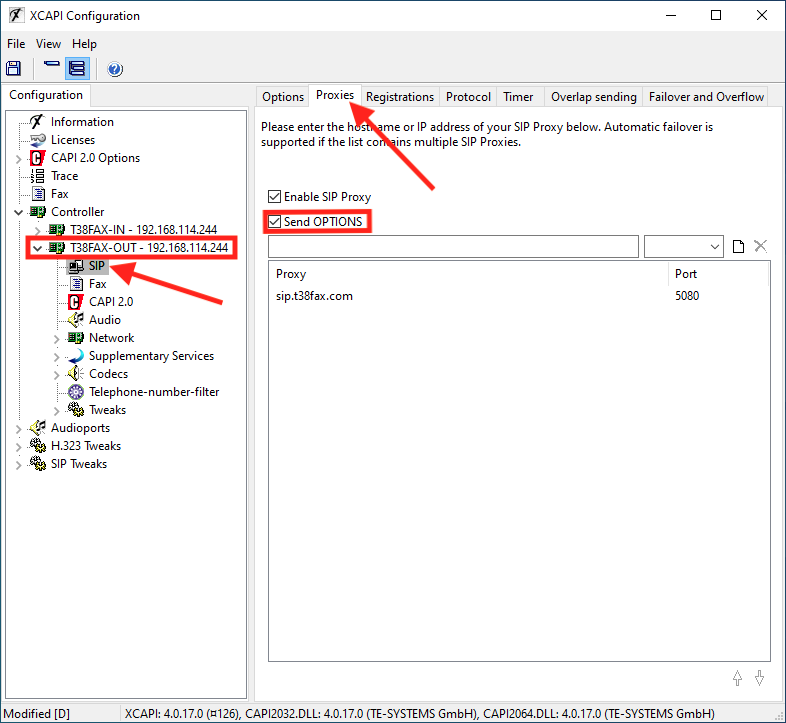
Select Controller > T38FAX-IN -> SIP from the sidebar. Go to the Proxies tab and check Send OPTIONS. Note that the aforementioned pastel yellow warning bar appears once the controller is selected.

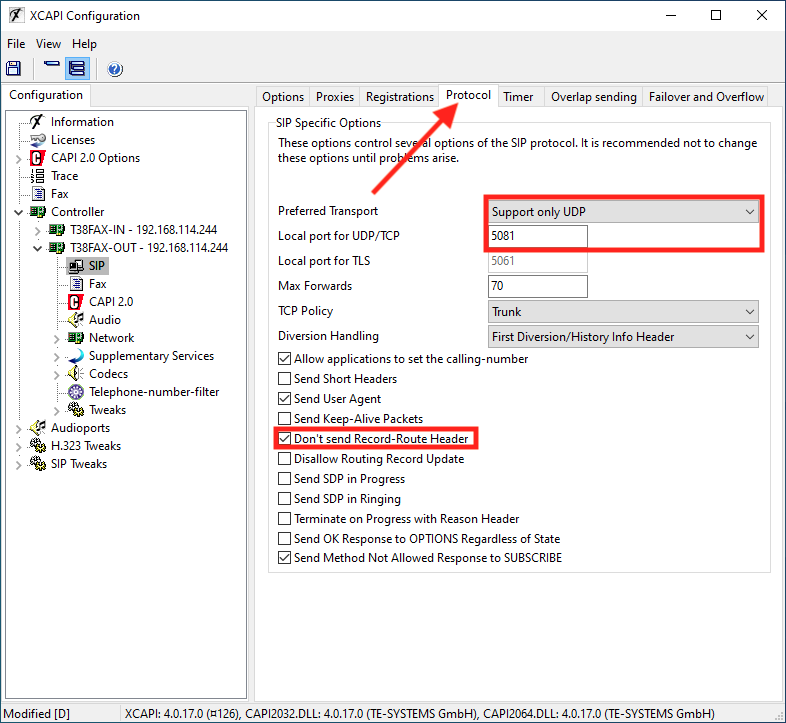
Go to the Protocol tab and make the following changes:
- Preferred Transport: Support only UDP
- Local port for UDP/TCP: 5080 ⓘ
- Don't send Record-Route Header: checked
- Send OK Response to OPTIONS Regardless of State: checked
After the Local port for UDP/TCP field is changed, note that the pastel yellow warning bar disappears.
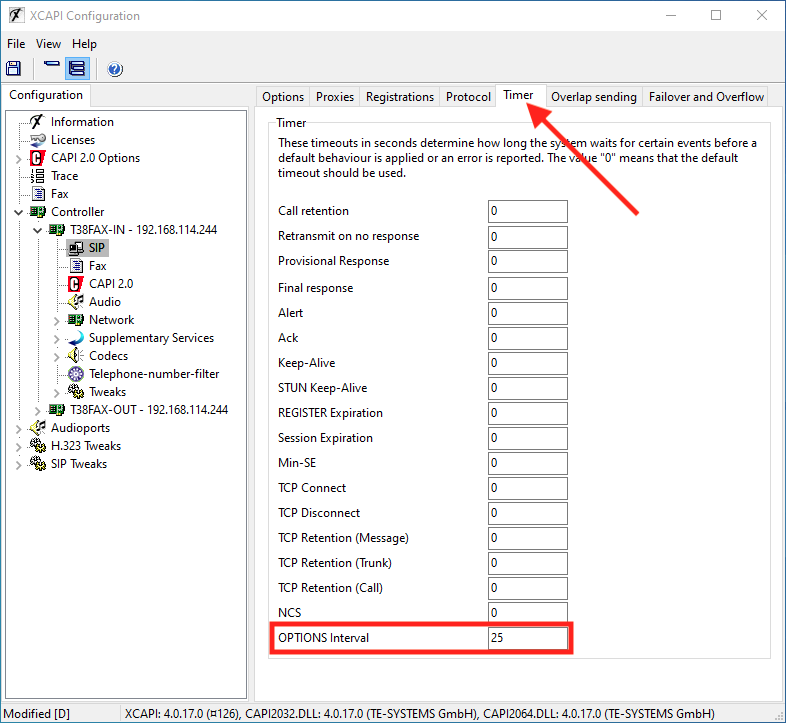
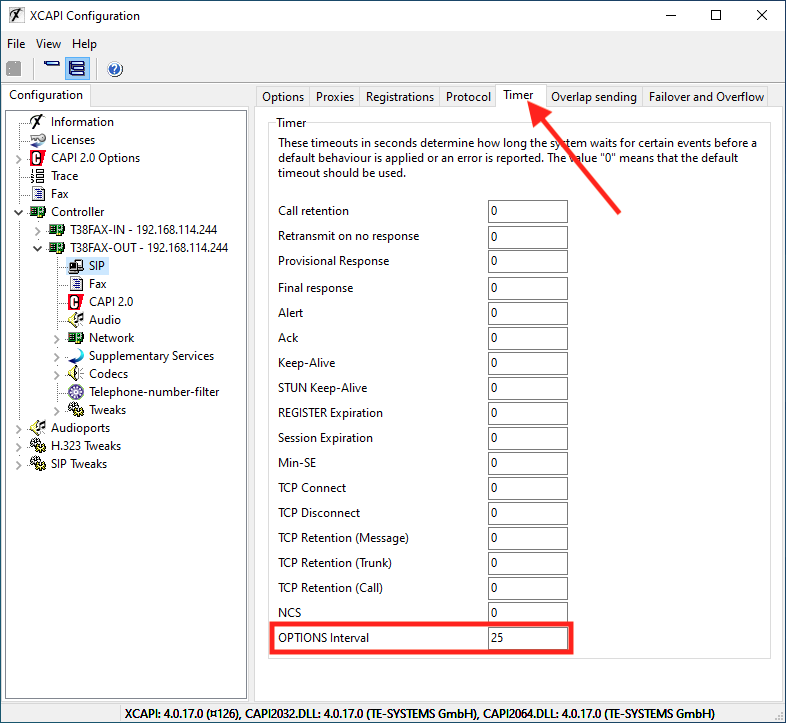
Go to the Timer tab and set the OPTIONS Interval to 25
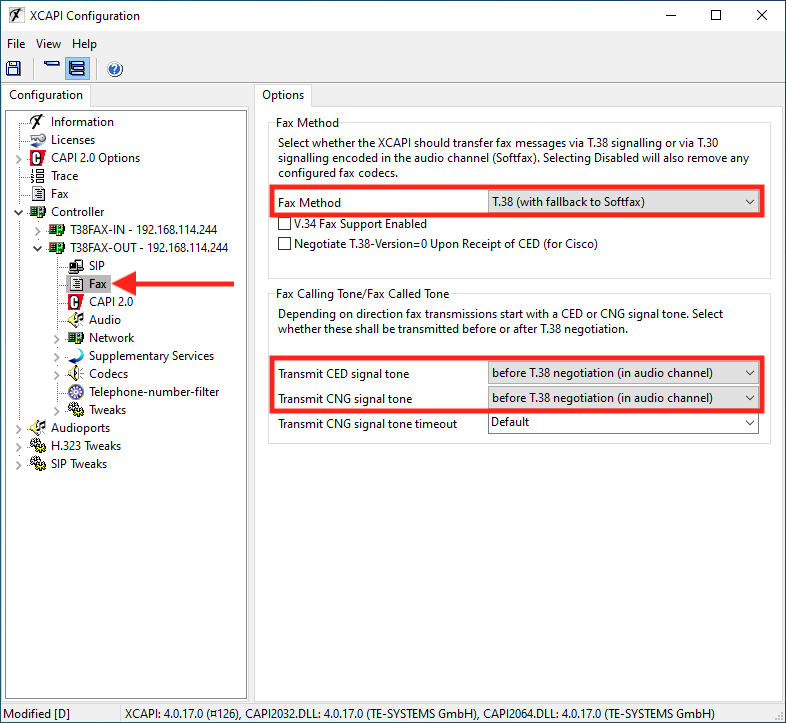
From the sidebar, navigate to Controller > T38FAX-IN > Fax and make the following changes:
- Fax Method: T.38 (with fallback to Softfax)
- Transmit CED signal tone: before T.38 negotiation (in audio channel)
- Transmit CNG signal tone: before T.38 negotiation (in audio channel)

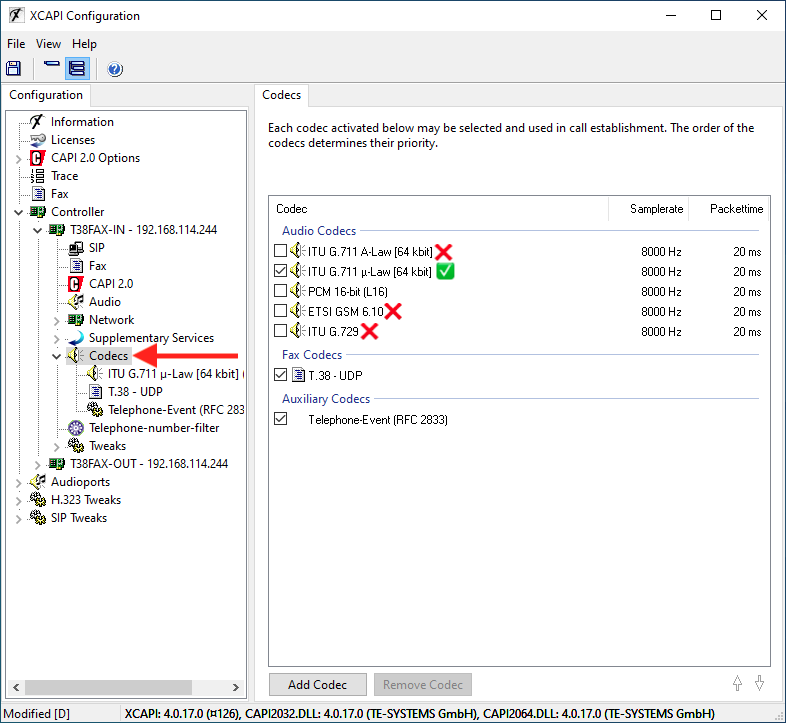
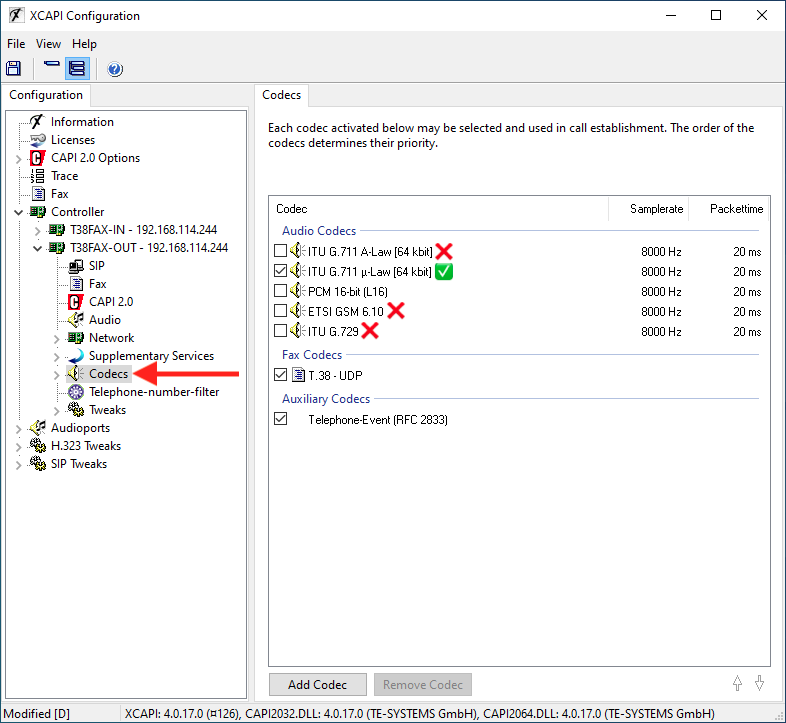
Use the sidebar to navigate to Controller > T38FAX-IN > Codecs and disable all codecs except G.711 µ-Law [64 kbit].
Configuration of the inbound controller is now complete. It's recommended to collapse the T38FAX-IN controller at this point.
Configuring the Outbound Controller
Using the sidebar, navigate to Controller > T38FAX-OUT > SIP. Select the Proxies tab and check Send OPTIONS.
Go to the Protocol tab and make the following changes:
- Preferred Transport: Support only UDP
- Local port for UDP/TCP: 5081 ⓘ
- Don't send Record-Route Header: checked
Unlike for the inbound controller, which used 5080 for its local UDP port, we are setting 5081 on the outbound controller. If you set both controllers to 5080, the pastel yellow warning bar will reappear and your server will not function correctly.
Go to the Timer tab and set the OPTIONS Interval to 25
From the sidebar, navigate to Controller > T38FAX-OUT > Fax and make the following changes:
- Fax Method: T.38 (with fallback to Softfax)
- Transmit CED signal tone: before T.38 negotiation (in audio channel)
- Transmit CNG signal tone: before T.38 negotiation (in audio channel)
Use the sidebar to navigate to Controller > T38FAX-OUT > Codecs and disable all codecs except G.711 µ-Law [64 kbit].
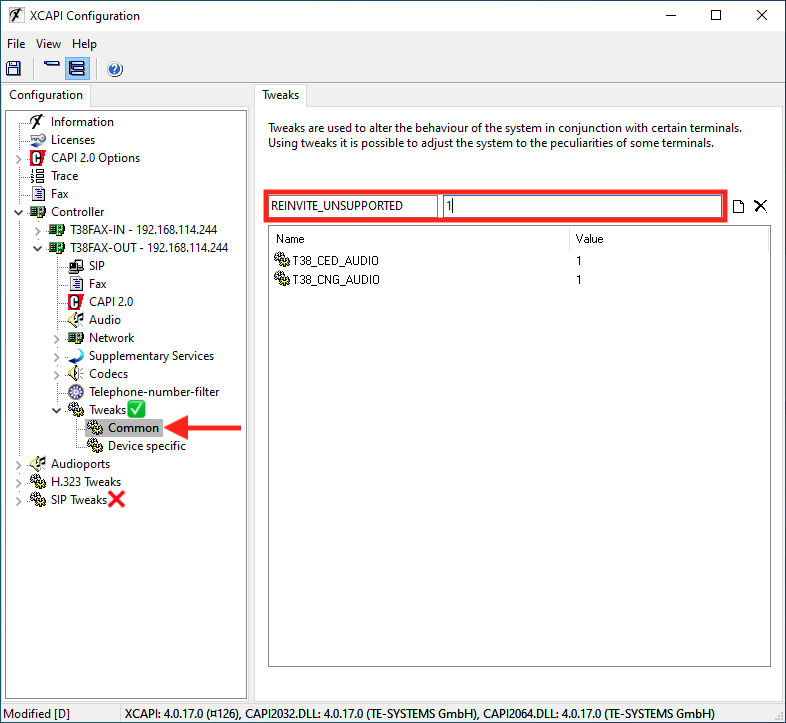
In the sidebar, navigate to Controller > T38FAX-OUT > Tweaks > Common. Ensure that this is the controller-level Tweaks section, not the global-level SIP Tweaks section. Type REINVITE_UNSUPPORTED into the left box and 1 into the right box. Ignore the page icon setting to the right of these fields: this button is not a "save" button, it is for adding multiple tweaks at once.
Saving the Configuration
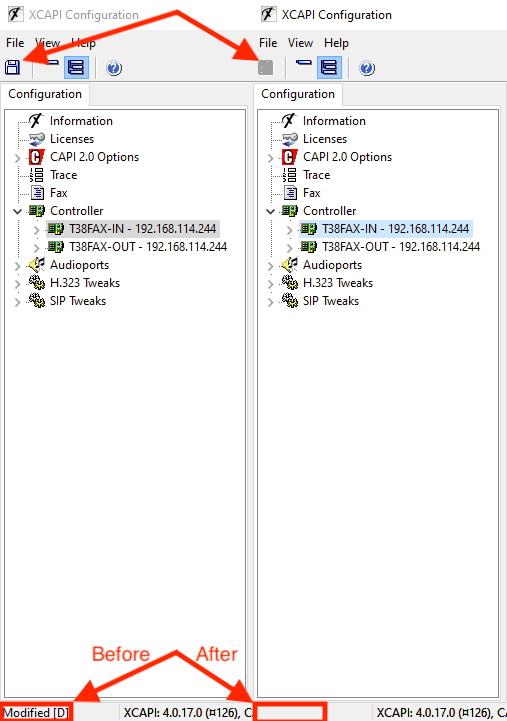
To commit your changes, click the floppy disk icon in the top left-hand corner of the window. All recent changes are saved if the floppy disk icon is gray and the state in the bottom left-hand corner of the screen is blank instead of Modified.
WARNING: if you completely run through the XCAPI Controller Wizard again on an already-configured controller, even if no changes are made, the Local port for UDP/TCP setting under Controller > [Edited Controller] > SIP > Protocols will be reset to 5060. If you run through the wizard on just one controller your server may still work, depending mostly on your firewall. If you run through the wizard on both controllers, the pastel yellow warning box will appear and your controllers will no longer work correctly. In either case, if you ever return to the XCAPI Control Wizard, always make sure to set this back to the correct value.
Testing the Configuration
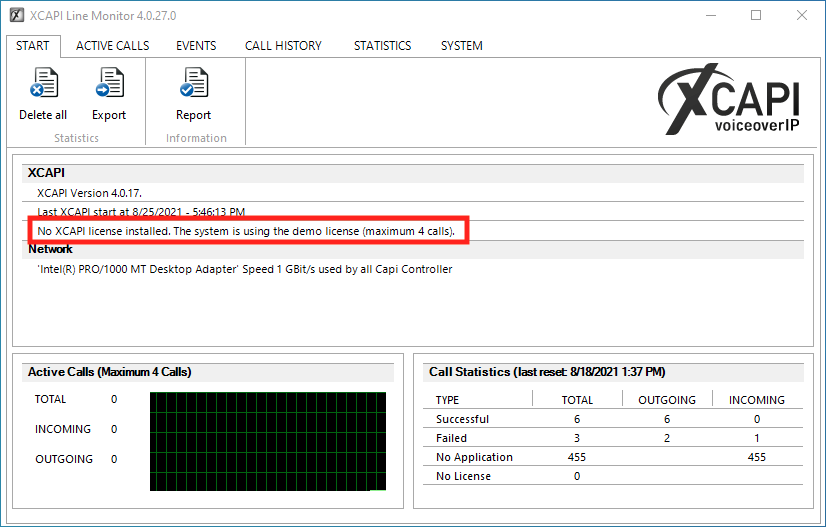
This section outlines how to use the included server-agnostic XCAPI testing facilities to ensure XCAPI is installed and configured correctly. To start, launch the XCAPI Line Monitor. Under the Start tab, the default tab when opening the application, ensure that your XCAPI channel licensing has been correctly applied.
Once you're sure your licensing is applied and that your trunk is registered, you can try to test inbound and outbound calls. Launch the XCAPI XTest application. Before sending a test fax, Select the Options (gear icon) menu item in the top left corner of the window. There are two important issues to consider, both resolvable in the General tab:
- We can test only one controller at a time. If you try to receive a fax while the outbound controller is enabled, the inbound call will not be answered. If you try to send a fax while the inbound controller is selected, the call will go through and most likely be answered, but the fax will still fail. If you're having issues, double-check that you have the correct controller selected for the direction you want to test.
- By default, XTest expects you to manually answer inbound calls. Check Auto answer so XTest will automatically answer inbound faxes.
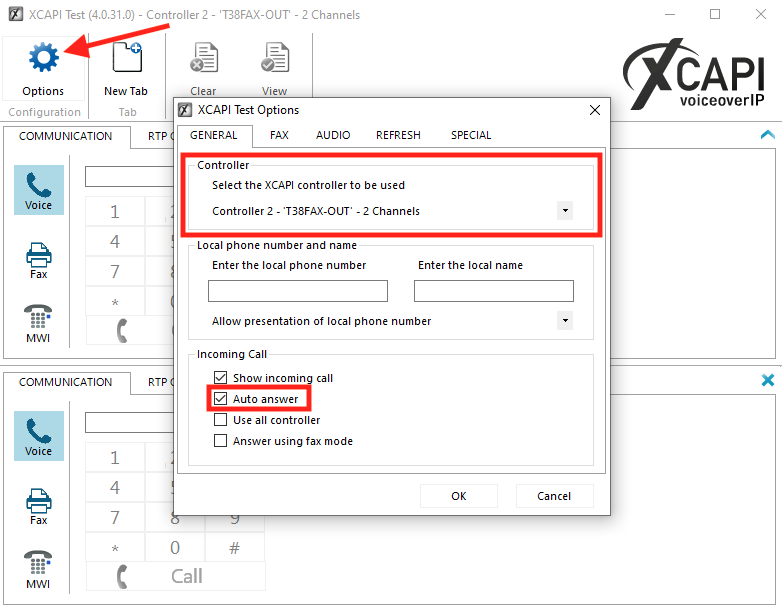
Click OK when you've made the necessary changes for your test.
Now you can place a test call.
Testing Outbound Faxes
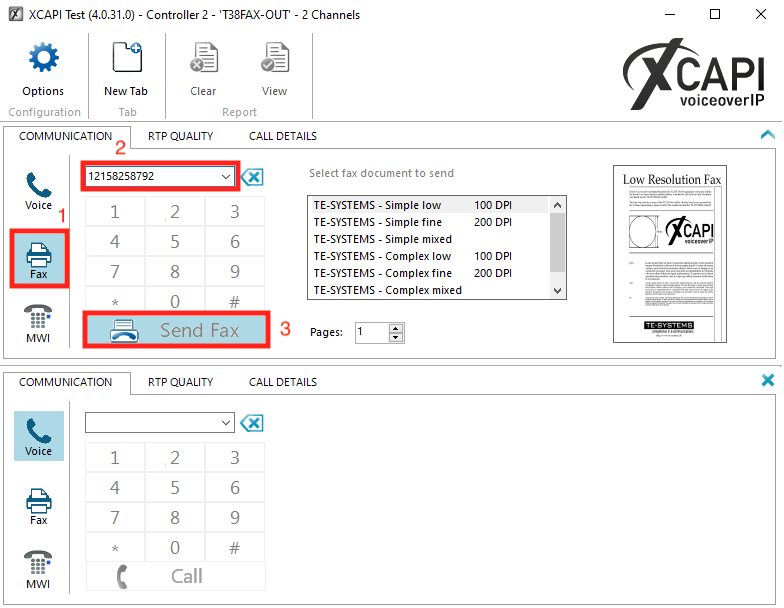
In the Communication tab, select the Fax button from the far left sidebar and enter the number you want to dial in the 1+10 digit format: no dashes, spaces or parentheses. Then click Send Fax.
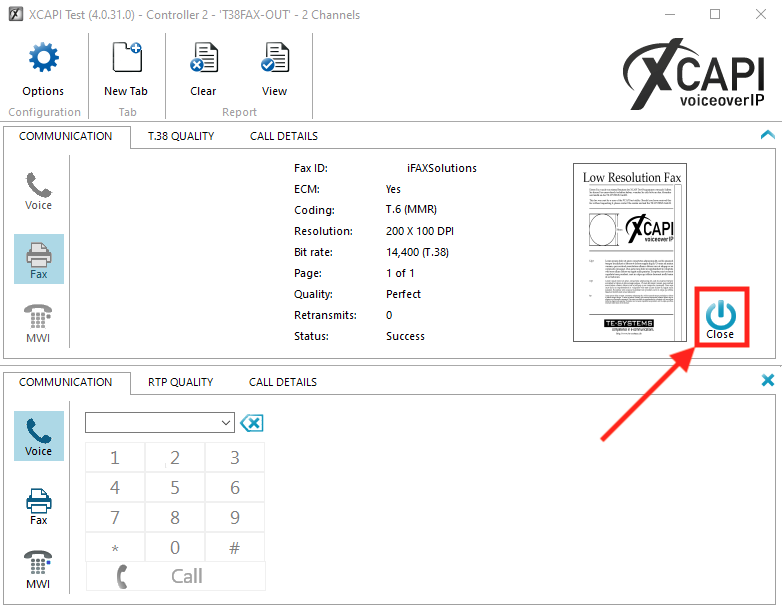
After the call is done, click "Close" to send another one. The close button is shown in the screenshot below.
Testing Inbound Faxes
To test an inbound fax, send a fax from another endpoint to this number. We do not recommend trying to use faxback services for this test since close attention is required to switch the XTest utility's configuration from using the outbound controller to the inbound controller in time for the return fax to call in, but it may be possible for some faxback services. If all else fails, feel free to contact T38Fax support by phone.
Unlike with outbound faxes, inbound calls will automatically to switch to fax mode, Also unlike outbound faxes, after an inbound fax is received you'll do not have to close out of the fax job in the XTest utility.
Troubleshooting
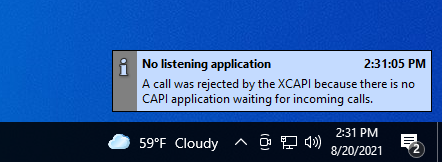
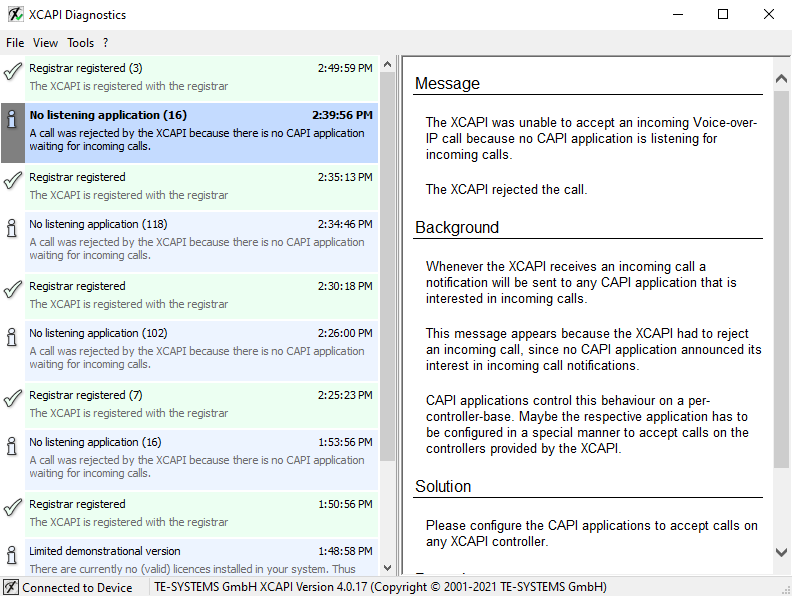
If you're having trouble sending or receiving faxes, you can find out more information with the XCAPI Diagnostic Monitor. The XCAPI Diagnostic Monitor runs in the background and provides pop-up information about the XCAPI controllers' statuses. For example, in the screenshot below it is sending a pop-up in the bottom right-hand corner of the screen that there were no trunks available to answer the inbound call. The solution in this case was to change the Options menu's Controller setting from Controller 2 - T38FAX-OUT to Controller 1 - T38FAX-IN.
The application window for the XCAPI Diagnostic Monitor keeps a history of all events. Clicking on an individual event provides further information.
Comments
0 comments
Please sign in to leave a comment.